Showing posts with label Itsy Bitsy. Show all posts

November 17, 2016

Thinking of You Critters Card

Hi friends, today I am sharing a card after a short break. First the festive season kept me busy and then me and my son fell ill for some time. I am trying to slowly get back to crafting. So the cards may not be perfect, but they sure lift my mood up by keeping me happy and busy.

I started out with the scrap piece of red paper that was left over after punching out few scalloped circles from a punch. The whole idea of the card is based on that only.

Then I stamped and colored few critter from a TPC stamp set and stuck them behind the red piece so that it looks like they are peeking out of a window.

For creating an illusion of a forest, I stamped out a bunch of leaves from Itsy Bitsy stamp set and colored them using Zig Clean Color Real Brush pens. It was quite a task to fussy cut these tiny and intricate leaves. I just kept on layering them around the red window to cover up the whole space. 

Lastly, I stamped and added a sentiment from another stamp set and also glued in a few sequins.


That's all for today! Have a great day!

August 11, 2016

DIY Lamp Shade Makeover

Hello! Today I am sharing how I upcycled this boring looking lampshade into an interesting one by just using pattern papers and tape. 


Below is a step-by-step guide on to how make your own lamp shade sleeve. I am calling this a sleeve because I did not remove the old cover. I just covered it up with a new sleeve that can easily be slid on and off and I can change the look when desired.

Step 1: Select pattern papers of your choice. I have chosen a DCWV paper stack from Itsy Bitsy.

Step 2: We need 4 panels for the lamp shade. One panel measures around 8x11". Cut two panels of 8x11". For the other two panels, keep a 1" margin (length wise) on both sides so that we can overlap the paper while sticking.

Step 3: Apply strong adhesive or double sided tape on the panels that have the extra 1" margin.

Step 4: Stick the 4 pieces together. Do not adhere the 4th panel to the 1st one yet.

Step 5: You may decorate it by adding some lace or punch out designs using border punches. I have used MS border punches to punch out some designs in contrasting brown color and glued them to the top and bottom end of the panels.

Step 6: Wrap the panels around the old lamp shade base and stick the fourth panel over the first one.


Thanks for stopping by my blog!!

November 25, 2014

Handmade Christmas Card 2014 - Design 5

Hello and welcome to my series of Christmas cards for the year 2014. This is my fifth card. You may like to view all my Christmas cards here.
 
I have CASEd Jennifer Mcguire's card. I really loved this technique and wanted to try it out. Though I did not have similar stamps that she used, I made the card with whatever I had with me. Hope I did some justice to her pretty card.


The sentiment is from Penny Black stamp set.
 
 And for embossing the Xmas trees I used the We R Memory Keepers' border stamp from Itsy Bitsy.

 
Thanks for visiting. 

October 17, 2014

Decoupage Mdf Jewellery Box

Hey there! Finally I tried my hand at another big decoupage project. I bought this six compartment mdf box from Craftslane. I wanted to make a jewellery box for myself so I wasn't afraid to experiment with this one. The pink according to me is a bit darker than I wanted it to be. But I guess it doesn't look that bad!! :)


I coated the box with white wood primer, and then painted with pink acrylic paint. Then I pasted the decoupage hydrangea tissue paper design all over the box. I then applied a generous coat of mod modge over it. To embellish it, I dug out these pretty flowers from Itsy Bitsy that I had been hoarding since a long time. The butterfly chipboard embellishment is also from Itsy Bitsy.
 
I created a cluster at the left top corner with a metal fairy charm and loads of pearls.
  
I also liberally stuck two lines of pearl and rhinestone border on all sides of the box.
 
And here it is, filled with all my junk jewellery :) It is also apt for gifting on festivals. You can fill it up with dry fruits or other gifts.
 
Challenges Entered

October 14, 2014

Handmade Diwali Cards 2014 - Design 1

I managed to sneak in some time to make some Diwali cards. I have been super busy with my little one, and I could make few Diwali cards while he was taking a nap.
 
I have used my favorite Ganesh stencil from Itsy Bitsy. It's so easy to make festive cards using this. I just had to take out my distress inks and dab over the stencil. The sentiment is computer generated. The bright colored card stock adds to the festive look.

 
This is the stencil that I used for the card. For my other Diwali cards, visit here. 
 
 Challenges entered

June 18, 2014

Pop-up Box Card - Birthday

Hello. Here is another Pop-up Box Card made on Birthday theme. I have used loads of embellishments from Itsy Bitsy. The sentiments are from various stamp sets and the big circle birthday message is a digi.

 
Some space at the back for writing a personal message.
 
Close-up of the panels...


February 14, 2014

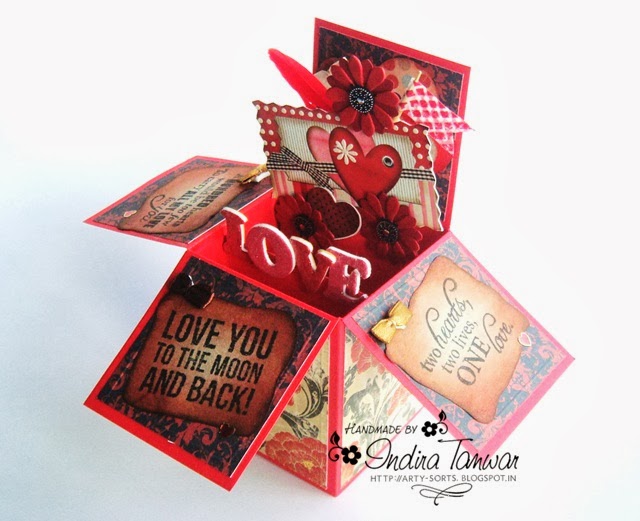
Pop-up Box Card

A few days back, I saw a tutorial for this type of card on Splitcoaststampers site and loved it to bits. It's like a short version of the explosion box, another favorite of mine. I wanted to try it out immediately. Here's a look at it.... and the beauty of this card is that it can be folded flat and tucked into a envelope or box!! How cool is that. I think I am gonna try more of these...


A close-up of the center part.... I have used a mix of stickers, flowers, feather and washi tape flag to adorn it.

I used brown paper from a cloth store paper carry bag and distressed it. I wanted an old vintage look on it. I have used the same paper to stamp the sentiments on. This space below, at the back of the box, can be used to scribble a private message.

This is how it can be folded flat....

The pattern paper used here is from Lulupu store: Bo Bunny Serenity Collection 6x6" Paper pad. 

Hope you like it and I would highly recommend to give it a try.

Challenges entered
Lulupu Challenge #25 - Oh So LOVE-ly!

February 12, 2014

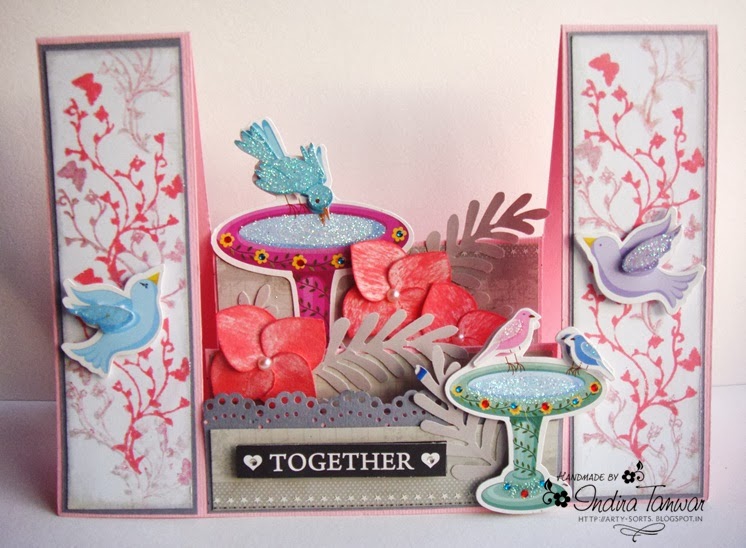
Center Step Card for Love Birds

Hi friends! Hope you all are doing great. Today's card is a very different type of card that I attempted and the color combo that I have used is also something I never tried before.

I am not sure if its called a center step card. I had followed a template from the net to cut this long back and I took it out recently to work on it.

For the panels I did some stamping with the same stamp twice using two different colors. I am forgetting the name of this technique right now. For the center steps I used Itsy Bitsy's sticker backing paper as matting. These pretty stickers are also from Itsy Bitsy. The flowers are handmade using this template.


A close-up of the center... the leaves are punched from an old brochure.

Challenges entered
Crafting for all Seasons - #70 Romance
Crafty Creations - #256 for the birds
Paper Minutes - #308 Love is in the air

October 31, 2013

Handmade Diwali Card using Stencils and Distress Inks - 2

Hi, this is the second diwali card that I made using the damask stencil from Itsy Bitsy store.
You can view my other card made using this stencil here...


October 30, 2013

Handmade Diwali Card using Stencils and Distress Inks

Hello!! I am back with another diwali card using this beautiful damask stencil which I purchased from Itsy Bitsy store.


This is the stencil that I used. Its so easy to use and the pattern is so pretty! 

Challenges entered
Craft Room Challenge - Stencils & Masks

October 28, 2013

Black and White Anniversary Card

Hi folks. Here is a quick post to share a card I made particularly for Sindhu's challenge.
Its a Black and White Anniversary Card. The sentiment is a digi. The couple silhouette is from internet. I traced it and handcut it. The black and white border is from Itsy Bitsy. I have added some lace below the border to add a touch of elegance.


Challenges entered
The Crafting Cafe - Anything Goes
Perfectly Rustic - Pattern Paper

November 9, 2012

Handmade Diwali Cards Using Stamps

Do check my other posts for today to see all the cards, or you can click the Diwali label to see all my Diwali cards.
For this card I have used wooden paisley and floral Mehendi (Henna) stamps that we get very commonly at the market. I colored them using sketch pens and added a hint of bronze paint. The golden stickers are from Hobby Ideas.
I have deliberately not added any sentiment here so that it can be used for other festivals as well.
 This is one card I really wanted to try out: coloring the Diya. I traced the diya using this stencil from Itsy Bitsy and deocrated and colored it. The border stamp is again from Itsy Bitsy. I added colored rhinestones on it. The sentiment stamp is from Jovita's store.

Handmade Diwali Cards Using Ganesh Stencils

Do check my other posts for today to see all the cards, or you can click the Diwali label to see all my Diwali cards.
For these 2 cards I used Ganesh stencil from Itsy Bitsy.
For the first card, I have done coloring using normal sketch pens and outlined using 3D outliner. The stamp used for the border below is also from Itsy Bitsy.

 For this card I colored the Ganesha using bronze paint and outlined using 3D outliner. The bronze stamp impressions on top and bottom is made using Hobby Ideas mini stamps.

Handmade Diwali Cards Using Stencils

Hi friends. As mentioned in my last post, I am back with my bunch of Diwali cards. Do check my other posts for today to see all the cards, or you can click the Diwali label to see all my Diwali cards.
For this card, I used the diya stencil from Itsy Bitsy. I sponged the diya design on the card....
For this card also I have used the same stencil but I traced the diya design and and outlined it using 3D outliner. 
For this card, I use a stencil from Pie Lane.

October 9, 2012

CAS Stamped Card

Hi friends. Posting after almost a week today. Not been feeling too well. The weather here is also very weird. It is sunny in the morning and rains every evening with lightning and thunder.
This is a CAS Stamped Card that I made. The colored paper is from Itsy Bitsy. I really like the colors and the texture of this paper. I punched the circles and randomly stamped the same stamp on the circles from different areas. The checkered ribbon is from stash. The star die cut is also from Itsy Bitsy.
Hope you all have a great day. Thanks for stopping by!

Challenges entered
Robyn`s Fetish - Circles
Sentimental Sundays - must include a Sentiment - Anything Goes
Catch The Bug - Anything Goes
Craftymess Challenge - #19 Anything Goes

September 20, 2012

Clean and Simple 207

Hi. I made a card based on Clean and Simple Sketch #207. I really liked this simple sketch and wanted to play with it :)
The bright colored papers are from Itsy Bitsy. The floral stamp is from Varna's Store. And the sentiment stamp is from Jovita's store.

Challenges entered
Clean and Simple - Sketch #207

July 25, 2012

CD Mini Album

Hey! Sharing my first CD mini album. I wouldn't have dared to make this, if not for the swap arranged by the 3 stooges - Khushboo, Tejal and Soumya. And I must say their inpirations and helpful guidance helped me to make one and participate in the swap. I had absolute fun making this and I am now glued to making mini albums :)

**Picture heavy post**
The cover: I've used mixed sets of papers from Paper Mania for the entire album. The flowers are made using big daisy punch. The center of it is actually metal. I have used hair clips that come in different colors. I detached the twirls and placed them behind the flowers. The alphabet stickers are from Itsy Bitsy. The 1" craft binders are from A1 craft supply.
Panel 1: I have used bunting here using circle punch. For some more ideas on using circle punch, refer my tute here.
The frame die cut and tag are from Itsy Bitsy. The green butterflies are from Pie Lane. I also stamped the butterflies to create an added effect.


Panel 2: I really love this one coz it has a moving element. The four tags are lined together and fastened using an eyelet which allows movement. So when closed they all get in one line. When opened, they look like the pic below.
Panel 3:  These butterflies are from Itsy Bitsy again. I wanted to glam them up so I used my 5 petal flower punches for this. I have used 2 sizes of flowers, punched them on white glitter paper, cut each petal and stuck on to the b'fly. The center is done using black rhinestones. The flowers on the left are the ones made using small flower punch. 
Panel 4: Did you notice the bg here.... half moon shaped. Its a simple page to jot down Birthday memories. The cupcake and gift box embelishments are from Itsy Bitsy. 
Panel 5: I loved this page too..... the way it turned out to be. The letter I and white panel are handcut. Ribbons are from my stash. The pink flowers are punched using large flower punch. 
Panel 6: This is a simple one again. I added some flower shaped buttons. I cut a doily into half and used for bg on top of the PP. 
Panel 7: I have made a small pocket here with a tag insert.  
Panel 8: This is also an interesting page. I created some space for journalling. That cute li'l flag adds to the overall look of the page.  
Some more photos...... I just couldn't stop clicking :) :)

Tip: In case you don't have a punch to drill holes into the CDs, you can heat an iron nail and use it to drill holes in to the CD. I have used this technique for the CD Mini album. 

Challenges entered
Top Tip Tuesday: All about circles
There's Magic in the Air - Waste Not
Penny Black and More - Summer Blooms
Anything Goes Challenge - #72 Let's Not Be Square
Related Posts Plugin for WordPress, Blogger...