February 26, 2014

Lattice Window Card

Hi everyone!! I have been meaning to try out a lattice window card since a very long time, and finally I got the time for it. Though tedious, I loved creating this lattice window. I am also going to try out different versions of it. I first created this panel and then mounted it on a green card base. Love how the green peeps out of the white panel.


I also have been doing a lot of watercoloring these days... my cards in coming days will reveal those! I printed a whole lot of these pretty digis from the net and colored them using Faber Castell watercolor pencils. This one is from Beccy's blog. When I completed coloring this, I had a vision in mind as to how I wanted my card to be and I was able to achieve what I had thought of. I wanted a very subtle but intricate background for this.

Here's a look at behind the scene pics... I used an old piece of CS to create the lattice, thus the coloring on the strips. 

That's all for today... Ciao!!

Challenges entered
BGC #46 - Love is in the Air
Lulupu Challenge #26 - Try Something New !

February 20, 2014

Triangle Front Card

Hi Friends. Today I am sharing a very different kind of card that I saw on You Tube. I loved the simplicity of this card and I think with our imagination we can do a lot with it. In case you are not able to view the video, I have made a small template below to show you how to make this card. The template is not to scale and is only a guideline.


I have used this rose stencil from Pie Lane for the design on the center portion. Since I wanted multiple roses and not the full stem, I masked some areas of the stencil and made my own pattern.

The diagram below will give you an idea about how the triangle part is cut. Take any size of card say for example 4x6" in this case.  On the front side, mark the center point of the card and cut along dotted lines as shown. Cut another panel of the size of the card front which will be placed below the triangle part. For more details, do refer the video I have shared.


Challenges entered
Lulupu Challenge #26 - Try Something New !

February 17, 2014

Using Multiple Stamps on one card

Hey there. Here is a card that I created using stamps from multiple stamp sets simply because one stamp set did not have the kind of images I was looking for. I found this technique quite fun and I now feel I can get more from my stamps by combining them this way. The overall card is inspired by Jennifer Mcguire's this card.

I first stamped in the sentiment 'Hello' and then positioned the flowers and leaves around it. After stamping all the images with black ink, I started coloring with my Faber Castell color pencils. The alphabet stamp that I used here only has the outlines, so I filled the alphabets using silver pen. Then I finished the card with some gemstones in flower centers. For the border I have used a washi tape in the background.


Challenges entered
Lulupu Challenge #26 - Try Something New !
Crafty Sentiment Designs - Anything Goes
Ribbon Carousel Challenge - RCC90 Washi Tape
Sweet Stamps - # 157 Anything Goes

February 14, 2014

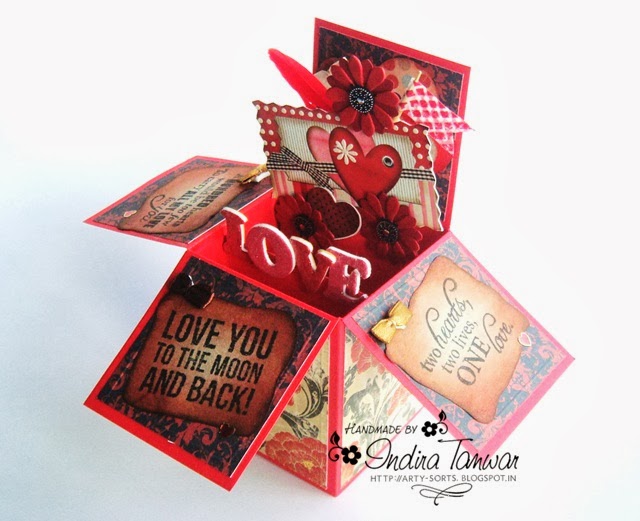
Pop-up Box Card

A few days back, I saw a tutorial for this type of card on Splitcoaststampers site and loved it to bits. It's like a short version of the explosion box, another favorite of mine. I wanted to try it out immediately. Here's a look at it.... and the beauty of this card is that it can be folded flat and tucked into a envelope or box!! How cool is that. I think I am gonna try more of these...


A close-up of the center part.... I have used a mix of stickers, flowers, feather and washi tape flag to adorn it.

I used brown paper from a cloth store paper carry bag and distressed it. I wanted an old vintage look on it. I have used the same paper to stamp the sentiments on. This space below, at the back of the box, can be used to scribble a private message.

This is how it can be folded flat....

The pattern paper used here is from Lulupu store: Bo Bunny Serenity Collection 6x6" Paper pad. 

Hope you like it and I would highly recommend to give it a try.

Challenges entered
Lulupu Challenge #25 - Oh So LOVE-ly!

February 13, 2014

Heart-shaped Triple Easel Card

Hey there.... today I am sharing a very special card that I made for my husband. It's a heart-shaped triple easel card. I used red CS for this and the paper pack is from DCWV.

The flowers are handmade. I had earlier posted a tutorial on my blog for these flowers.


This is how it looks when laid flat.

Challenges entered
Lulupu Challenge #25 - Oh So LOVE-ly!
Color Conceptions Challenge #7- Photo Inspiration [Inspiration was the color and geometric pattern]

February 12, 2014

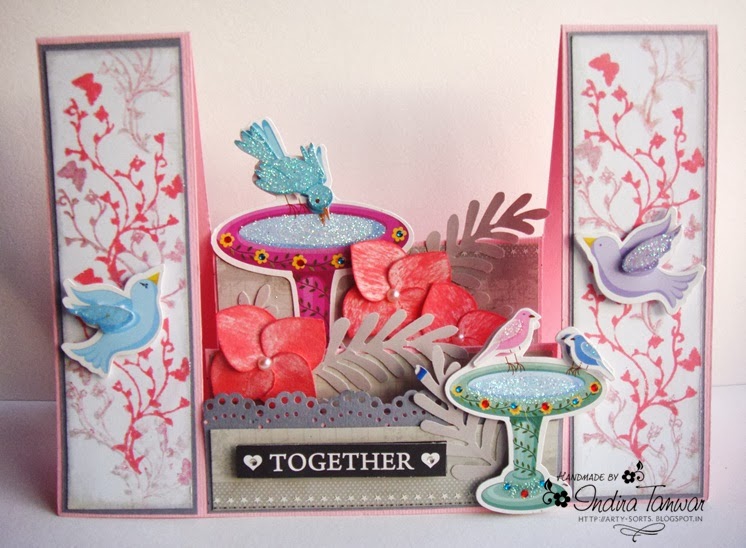
Center Step Card for Love Birds

Hi friends! Hope you all are doing great. Today's card is a very different type of card that I attempted and the color combo that I have used is also something I never tried before.

I am not sure if its called a center step card. I had followed a template from the net to cut this long back and I took it out recently to work on it.

For the panels I did some stamping with the same stamp twice using two different colors. I am forgetting the name of this technique right now. For the center steps I used Itsy Bitsy's sticker backing paper as matting. These pretty stickers are also from Itsy Bitsy. The flowers are handmade using this template.


A close-up of the center... the leaves are punched from an old brochure.

Challenges entered
Crafting for all Seasons - #70 Romance
Crafty Creations - #256 for the birds
Paper Minutes - #308 Love is in the air

February 7, 2014

Handcut Stencil Card

Hi lovely people out there! I am here to show you another card I created using a handcut
stencil. The fascination with stencils still continues after the Stencilled class....

I have been experimenting with stencils when I was in school and I used to trace the patterns that I liked and cut them using a normal craft knife or blade. I still have many of those stencils with me. After watching the Stenciled class, I was looking for more designs in my stash and didn't want to indulge in buying many of them and then not using them. Also I didn't have the patience to order and then wait to create till my stuff arrived.

So I decided to try cutting some patterns on my own. Here is a one with simple diagonal lines. I placed the stencil on CS and dabbed distress inks on it. Then I inverted the CS to make the criss cross pattern.

The paper I used to make the stencil is from an old diary. These were the separators inside the diary. These papers are of high gsm than the normal paper and have a glossy finish. I find it easy to cut through these papers.


Here is the stencil and the finished CS... I went in a VIBGYOR manner with the inks. I wanted to finsih the stenciled CS with ditressing the edges with co-ordination colors.

 This is the card I made using this as a background. Does anyone of you recognize this pattern I used on CS. Let me leave this open as a small quiz here. I will come back with the answer tomorrow :) HINT ***Clothing Brand***

That's all for now... cya and have a great weekend. If you have any queries regarding the stencils, do leave a comment below.

February 4, 2014

DIY Stencil

Hi guys.. this is another simple card that I made inspired by the Stenciled class.
I made a stencil using my giant daisy punch on a transparent packaging sheet. I must admit it is rather difficult to punch the packaging sheet. I could just partially punch and then the punch got stuck. I removed it carefully and cut out the uncut parts with a knife. I second stencil that I used is from Pie Lane.

I used Wild honey, worn lipstick and ripe permission distress inks for this technique. Used some beads from my stash to form the center of the flowers.

February 3, 2014

Upcycled Photo Frame

Hi everyone!! Today I am sharing a photo frame that I upcycled. It was a small square handmade picture frame, with plain bronze paper on it. I thought to make good use of it by experimenting with some mixed media.

I glued scraps of PP on the frame with some mod podge. Coated the PP with some silver acrylic paint. Stamped randomly on the surface and attached some washi tape here and there. Then I used some waste material like red bull lid, broken bracelet, bolts, etc. The two hearts are made from perfume bottle boxes which had shiny cover on them.

Then I used a stencil to create a pattern with modeling paste on two corners of the frame. Once the paste dried up, I colored it using distress inks. Added a sentiment and black pearls to finish the project. Hope you all like my creation.


Related Posts Plugin for WordPress, Blogger...