August 29, 2016

Happy Birthday Card with Altenew Striped Florals Stamp Set

Hi. Today I am sharing a card that I created for Altenew's August Challenge. I have used Altenew's Striped Florals stamp set for this card. 

All the flowers and leaves were heat embossed in gold and colored using Zig Clean Color Real Brush pens. The birthday sentiment is from a stamp set from Flonz Craft. I arranged the floral elements as a bouquet on the card base and popped up a few of them using foam dots for added dimension. Adhered a grey glitter tape at the bottom and added the sentiment with foam tape.


Challenges entered


August 27, 2016

Bookmarks for Teachers

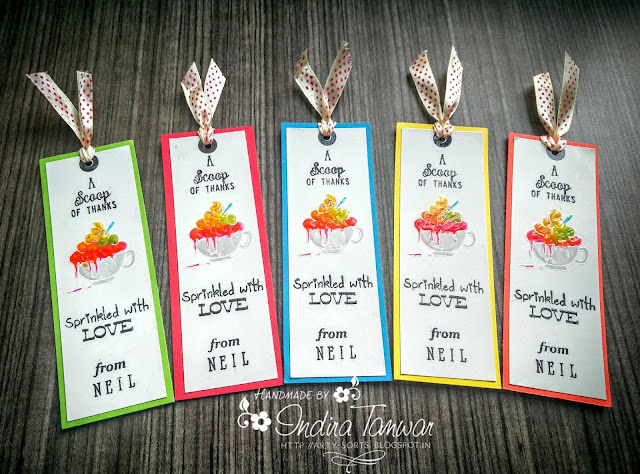
Hi friends. I made a couple of bookmarks for my son's teachers at his preschool. They are his first teachers and I wanted to make something special for them. I made a few cards too which I shall share very soon.


I used a mix of stamps from PABD - Summer Cooler, Avery Elle - Alphabet Stamps and Maya Road - Ornate Frames, to complete the sentence "A scoop of thanks, sprinkled with love, from Neil". I mounted the sentiment stamps all at once on my Stampoholic tool and that made my work so much easier. I stamped the wordings with Versafine Onyx black ink and embossed it with clear embossing powder. 

Then I white embossed the ice cream cup image and colored it using Zig Clean Color Real Brush pens. I used multiple colors for the ice cream scoop to give it an 'Ice Cream Sundae' look.


I applied glossy accents in swirly motion on the ice cream scoop and it looks oh so yummylicoius in real life!! Have a closer look!! I also stamped the small sprinkles image from the same PABD stamp set and embossed it with Zing hot pink embossing powder.  


At last, I mounted the white panels on colorful card stock and tied a ribbon on the top.


Challenges entered
PABD Challenge #9 - Color Inspiration


August 24, 2016

Repeated Stamping Card Lawn Fawn Flutter By Stamp

Hi there! Today I have another card that is created using just two stamps from the Lawn Fawn Flutter By stamp set. I had shared a card with the similar technique yesterday. You may like to check it here.


This technique involves a lot of masking, but its worth the effort. I wanted to achieve a stained glass effect with these stamps.


Here is how it looked after all the stamping and masking. Then I colored it using Zig Clean Color Real Brush pens. I gold embossed the sentiment using WPlus9- Whole Lotta Happy stamp set on green vellum and adhered it onto the colored card panel. Finished off by adding few sequins here and there....


Challenges entered
PABD Challenge #9 - Color Inspiration


August 23, 2016

Repeated Stamping Lawn Fawn Flutter By Stamp

Hi there! Today I have a card that is created using just two stamps from the Lawn Fawn Flutter By stamp set. 


I did a lot of masking and stamped the two floral stamps repeatedly to create this pattern. After stamping the three rows, I used the smaller flora stamp to fill in the gaps.


Here is how it looked after all the stamping and masking. 


Finally, colored the panel using Zig Clean Color Real Brush pens.


Challenges entered
PABD Challenge #9 - Color Inspiration


August 19, 2016

Altenew Painted Roses Birthday Card

Hey there.... Sharing a quick card I made using the Painted Rose Stamp Set from Altenew. This was my first try with this stamp set. 

To start with, I stamped the roses using Altenew Inks - Red Cosmos set and fussy cut them. I punched out a tile pattern repeatedly on a scrap piece of paper using a tile punch and stuck it on the card base. Then I heat embossed the sentiment from WPlus9- Whole Lotta Happy stamp set on green vellum and adhered it onto the punched piece. This way the tiled pattern did not overpower the design and at the same time gave a subtle look from behind the vellum piece.

Next I arranged the fussy cut roses around the sentiment and added some more punched tile and floral pieces next to them. Finished off the card using black rhinestones and a golden punched heart.


That's it for today. Do drop by again!!


August 11, 2016

DIY Lamp Shade Makeover

Hello! Today I am sharing how I upcycled this boring looking lampshade into an interesting one by just using pattern papers and tape. 


Below is a step-by-step guide on to how make your own lamp shade sleeve. I am calling this a sleeve because I did not remove the old cover. I just covered it up with a new sleeve that can easily be slid on and off and I can change the look when desired.

Step 1: Select pattern papers of your choice. I have chosen a DCWV paper stack from Itsy Bitsy.

Step 2: We need 4 panels for the lamp shade. One panel measures around 8x11". Cut two panels of 8x11". For the other two panels, keep a 1" margin (length wise) on both sides so that we can overlap the paper while sticking.

Step 3: Apply strong adhesive or double sided tape on the panels that have the extra 1" margin.

Step 4: Stick the 4 pieces together. Do not adhere the 4th panel to the 1st one yet.

Step 5: You may decorate it by adding some lace or punch out designs using border punches. I have used MS border punches to punch out some designs in contrasting brown color and glued them to the top and bottom end of the panels.

Step 6: Wrap the panels around the old lamp shade base and stick the fourth panel over the first one.


Thanks for stopping by my blog!!

August 8, 2016

Just for You Card - Lawn Fawn Flutter By

Hey friends!! Today I have a very sweet card made using this lovely stamp set from Lawn Fawn. I heat embossed the flowers and leaves and fussy cut them. Since the flowers were really very light in color, I added a bright peach matting on the card base and then started adding other elements on to it. First I glued the die cut window flat on the card and then arranged the flowers, leaves and another die cut leaf branch onto it. Then I heat embossed the sentiment from TPC stamp set on vellum, with gold embossing powder. Fussy cut it and added it in the center of the card. Finished off the card by adding few sequins randomly.


Thank you for stopping by my blog!


August 5, 2016

Altenew Persian Motifs Glitter Overload

Hi all. This card was made for Altenew's June challenge but I felt it wasn't good enough to enter the challenge, hence didn't post it then. If you overlook the design of the Altenew Persian Motifs stamp set, on its own the card looks fine. I put in a lot of hard work for this card but it didn't turn out as intended. 


I started by heat embossing the design on watercolor paper and then stamped the sentiment above it. Thereafter, I filled in the pattern using very fine glitter from Pie Lane. I added glue into the tiny spaces in the design and that is where some of the details of the design got lost. But on the whole, if you see, the design looks fine.

Once the glitter part was over, I watercolored the background using my Zig Clean Color Real Brush pens. Then I felt the design got lost with watercoloring around it, so added yellow highlights in the spaces which was not filled with glitter. 

Lastly, I finished off the card with some ink splatters and sequins.


Here's a glimpse of how I added the glitter on the pattern....


I would love to know your views about the card. Thanks a lot for stopping by.

Related Posts Plugin for WordPress, Blogger...