October 3, 2017

15 Diwali Card and Card sets for 2017

Hello everyone!! I am at Mudra blog today with a huge set of Diwali inspiration for you all!!

This month our challenge is Festive Colors and we had an amazing festive stamp release in September. I have used almost all the new stamp sets for my cards. Do hop on to Mudra Blog to view all my projects.


July 30, 2017

Baby Boy's First Year Interactive Album

Hello Everyone!! 


Today I am sharing my son's first year album. He is already 3 now but I never got the time to work on the album. I wanted to incorporate a lot of things in the album and make it complete with all the pictures, etc, so all the planning took a lot of time. I have been collecting the papers, embellishments and other stuff for the album since a long time, so that whenever I make it, I have all the things in place.

It took me almost 2 months to complete this album as I worked on it in bits and pieces. 

I got a box for the album and covered it with a pretty wrapping paper. The album will remain safe and secure inside the box. 

Few facts and figures about the album:
1. Box Size: 12.5x10.5x6 inches 
2. Album Cover: 9x9 inches
3. Album Spine: 2.5 inches
4. Album Pages: 8x8 inches
5. No. of Pages: 8 interactive pages
6. No. of 6x4" photos: 72
7. No. of 4x4" photos: 27 (incl. pics in inserts)
8. No. of 4x3" photos: 33
9. No. of 2x2" photos: 7
10. Total no. of photos: 139 (with placeholders for 12 more pictures to be added later)
11. Paper packs used: Echo Park Bundle of Joy Boy, Nana's Nursery Mat Stack Baby Boy, 
DCWV The Blossom Song Stack
12. Embellishments: Itsy Bitsy India, Local stationery stores


This is the box for the album....


A close-up of the bow and handmade tag....


This is how the album fits inside the box.... there is a slider partition that will hold his first dress and booties....


The album cover with the pretty decorative chipboard alphas from Itsy Bitsy...


Bundle of Joy embellishment created from the cover of the Paper Pack...


The 9x9" album with 8 inserts...


The charms and the bows on the spine...


Inside of the album cover and the first page...


The second page has my son's pictures with me & my husband. The third page has an envelope to hold the pregnancy scans and birth story...


On opening the second page, the flaps have more pictures with me and the on the right there are pictures with his Dad.... Behind the pictures are pockets to hold journaling tags...


The Family Tree page, which is my favorite, created from scratch using die-cuts...


The next pages are for the Baby Shower ceremony and Welcome Home...


This page is for Naming ceremony. It has lot of pictures from the occasion....


 These two pages are for Special Occasions & Festivals...


The left page is a continuation of Special Occasions and the right page is for his first Mundan Ceremony and Kuan pujan (rituals in India)....


This page is for pictures of his favorites..... like toys, song/rhymes, food,etc....


This page is for his 'Firsts'.... first soup, first bath, first air travel, etc...


The left page is a waterfall page with pictures of all 12 months.... and on the right is the First Birthday celebration page...

The left page is a continuation of the birthday page... while on the right are few more memorable pictures from his first year....


The last page is blank as of now.... to add anything that I might like to add later.....The inside of the album cover has a large pocket to hold tags and paraphilia....


The back cover of the album....


Here is a detailed video of the album along with the pictures.... Sit back, enjoy and do leave your precious comments and love.....


May 23, 2017

Double Tri-Shutter Card - Love Theme

Hi friends, today I am sharing a special fold card with Love theme. It's a Double Tri-shutter card with chalkboard design.


Below is the step by step guide as to how I created this card. This card was part of my DT project at Mudra

1. Made a Double Tri-shutter card using black CS.
2. Decorated it using pattern papers.
3. Then made four 4x3" panels to use as embellishments for the card.
4. Stamped using VersaMark ink and embossed with white embossing powder.
5. Added few elements using Signo White gel pen.
5. Drew borders using the same gel pen around the black embossed pieces.
6. Also stamped few images with Hero Arts Unicorn White ink to make my own custom chalkboard elements/stickers to decorate the smaller panels of the card.
7. Made a shaker element for the front panel using the heart die-cut and Mudra's Sugar Plum and Clear Sequins Mix.
8. Finished off the card by adding all the embellishments, flowers, die-cuts, etc.
9. Added a seam binding ribbon to keep the card shut.


Here are all the detailed pictures of the card...


Here is a video with view of the complete Double Tri Shutter Card


Thanks for visiting my blog!

May 22, 2017

Romantic Music Theme Explosion Box

Hi everyone! Today I have a multi-layered Magic Explosion Box to share with you. The paper pack used here is from DCWV Autumn collection. I have used some metal embellishments and vintage ephemera to give it a vintage feel. 

This is how the box looks when closed.


Cute little metal charms, ephemera and embellishments adorn the lid of the box.


The box has three layers inside with lots of space for journaling and pictures. This is the outermost layer that has space for photos. 


This is the second layer which can also hold more pictures tucked behind the chipboard embellishments. 


The innermost layer has pockets to hold tags that can be used for journaling. It has more space outside for journaling.


In the centre of the explosion box is a miniature wooden piano. I made a mini music book to be placed on top of the piano. Also placed a small bouquet and metal clock charm on it.


May 21, 2017

Birthday Party at McDonalds and a few DIYs

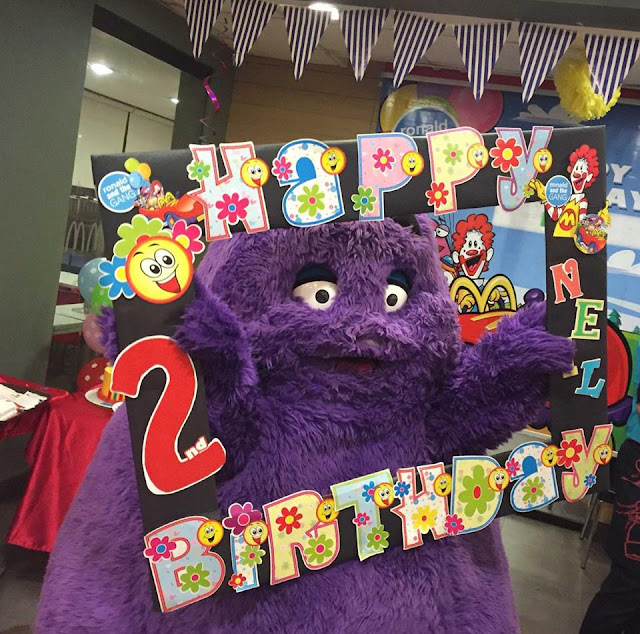
Hello everyone. This is such a delayed post! I am sharing details of my son's 2nd birthday celebrations which was in July 2016. 

We planned the Birthday party at McDonalds and availed their Ronald McDonald Birthday Party Package. Below I am sharing a few DIY projects and the cake that we ordered to match the theme.

A. First DIY - Photo Booth Frame

1. For this project I took a large cardboard box and cut a frame out of it.

2. Then I covered the frame with black chart paper.

3. I bought this readymade HAPPY BIRTHDAY banner from a local party supplies store and cut-off the bits and brads that held the alphabets together, thus separating all the alphabets.


4. I adhered the letters on the top and bottom part of the frame, as in pic below.

5. I also drew the number 2 with red card stock and added it onto the frame. 


6. I added the smiley on the left, which was a part of the birthday banner.

7. The 'Ronald and the gang' images are from the birthday invitation that were given as part of the party package.

8. Lastly I added my son's name with the chipboard letters that I had in my stash. The alphabets were plain white, so I colored them to match the rest of the frame.


The final frame


B. Second DIY - Photo props

1. I made the photo props from the party hats that are given as part of the birthday package by Mc Donald's. Once you sign up for the party package, you are provided with a set of goodies matching the theme that you choose. These include party invitations, hats, table mats, return gifts and hoards of game prizes. 


2. Out of the four characters in the Ronald theme I used up Ronald's cutout in the frame above.

3. I then used the rest of them to make 3 photo props below.

4. Simply cut out the design and stick them on wooden skewers. I also added the 'Ronald and the gang' badge from the party invites.


C. Birthday Cake - In Ronald McDonald theme

I wanted a cake in red and yellow to go with the theme colors. We got one custom made from a home baker.


D. Third DIY - Cake Toppers

1. I made cake toppers from the party invitation cards that were provided to us. 

2. Simply fussy cut the image and stick them on wooden skewers like I did for the photo props.


These are the birthday invitations provided by Mc Donald's. I used a few of them for my DIY projects.


I must say I really liked the party packages that Mc Donald's offers. I have jotted down a few pros for the same...

1. You can choose from an array of available themes like Ronald McDonald, Spongebob, etc.
2. You get matching paraphilia for the party.
3. Standard decor and table set-up. 
4. Party backdrop
5. Mascot appearance as per theme
6. Party host and MC
7. Standard McDo meal packages and custom packages available too
8. You can order their standard cake or get your own
9. They usually have tie-ups with event planners in case you want to setup additional candy tables, etc.
10. They also liaison with some photographers who have various packages and custom photo booth options.
11. The return gifts are nicely packaged in their custom theme boxes.
12. They offer loads of themed goodies as prizes for all the games.


The table set-up....


Mascot appearance....


My son was in love with this mascot and danced so much with him.


If you have queries regarding the DIY's or related to the birthday party at Mc Donald's, please leave a comment below and I shall answer it as soon as possible. 

Thanks a lot for dropping by!!

March 5, 2017

Mudra First Birthday Blog Hop

Hello and welcome to Mudra's “First Birthday Blog Hop”! 
Yes, Mudra is one year old this month and what an amazing journey it has been so far. And this month, we want to celebrate our big milestone with you because it wouldn’t have been possible without your support. We have so many fun things lined up throughout the month with lots of chances for you to participate and win some cool prizes.
We wanted to start the celebration today by bringing together our amazing design team and few of our friends to share some of their beautiful creations with Mudra products.
We have an amazing line-up of projects that you sure are going to love!

RULES:
- Follow Mudra Blog
- Like Mudra Facebook Page
- Follow us on Instagram
- Subscribe to our YouTube channel

- Visit all the designer's blog hop post and leave them some love.
- After finishing the blog hop, add your name in the ininkz in Mudra Blog Hop post.

PRIZES: 
To celebrate, Mudra is giving away a beautiful pack of crafting supplies from Mudra to 1 WINNER, selected from the comments across all of the blogs in the hop.  You have until Friday, March 15th at 11:59 PM IST to enter, and the winners will be announced here on Saturday, March 20th.
One additional Goodie Bag to a random participant sponsored by The Craft Shop, Chennai. 
And to sweeten the deal, some of our designers in the hop also have giveaways, so make sure to leave comments on all the blogs for a chance to win!
If you have come from Ekaterina's blog then you are on the right track. You can check out the complete list of participating blogs on the Mudra Blog

Now over to my card for the Blog hop....
I had the idea of this card in mind since a long time, and even tried it once before. But it didn't turn out the way I had envisaged it. Finally, I gave it another try and am totally happy with the outcome.
1. Took a white panel and drew diagonal lines on it with a black marker.
2. Used grid paper to line up and evenly space out the diagonal lines.
3. Took out smaller stamps from various stamp sets and stamped them in a repeated pattern with different colored inks.
4. Heat embossed the cake image on white CS and colored it using Zig markers.
5. Fussy cut the cake and at the same time cut out and an outline image of it with black paper.
6. Popped up the cake image on black outline to create a DIY embellishment.
7. Added some shimmer to the cake with clear Wink of Stella pen.
8. Glued this piece on the stamped panel.
9. Heat embossed the sentiment with gold embossing powder on black CS.
10. Adhered the sentiment on card panel and glued the whole piece on a top folding card base.
Check out the beautiful shimmer and dimension of the cake...
Your next stop on the hop is Kanan Pandya. Here's a little peek into her creation for the blog hop...


I hope you all enjoy the beautiful projects created by our team for the Blog hop. Let's join in the fun lined up on Mudra blog the whole month.
Related Posts Plugin for WordPress, Blogger...