Showing posts with label DIY Projects. Show all posts

May 21, 2017

Birthday Party at McDonalds and a few DIYs

Hello everyone. This is such a delayed post! I am sharing details of my son's 2nd birthday celebrations which was in July 2016. 

We planned the Birthday party at McDonalds and availed their Ronald McDonald Birthday Party Package. Below I am sharing a few DIY projects and the cake that we ordered to match the theme.

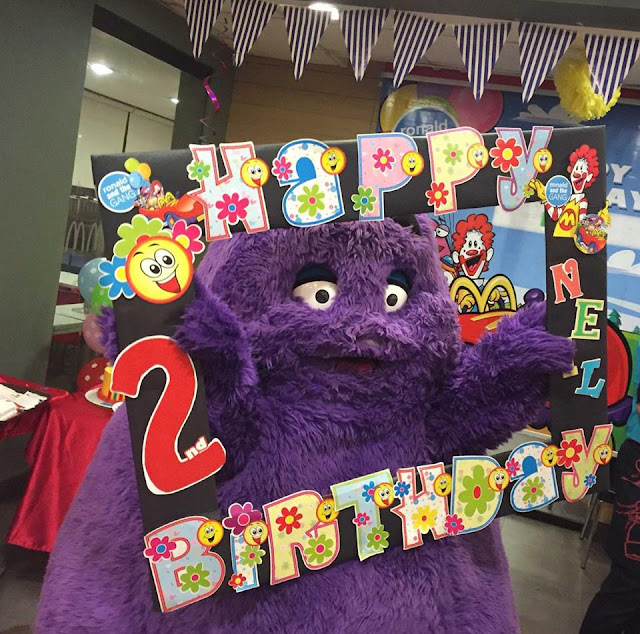
A. First DIY - Photo Booth Frame

1. For this project I took a large cardboard box and cut a frame out of it.

2. Then I covered the frame with black chart paper.

3. I bought this readymade HAPPY BIRTHDAY banner from a local party supplies store and cut-off the bits and brads that held the alphabets together, thus separating all the alphabets.


4. I adhered the letters on the top and bottom part of the frame, as in pic below.

5. I also drew the number 2 with red card stock and added it onto the frame. 


6. I added the smiley on the left, which was a part of the birthday banner.

7. The 'Ronald and the gang' images are from the birthday invitation that were given as part of the party package.

8. Lastly I added my son's name with the chipboard letters that I had in my stash. The alphabets were plain white, so I colored them to match the rest of the frame.


The final frame


B. Second DIY - Photo props

1. I made the photo props from the party hats that are given as part of the birthday package by Mc Donald's. Once you sign up for the party package, you are provided with a set of goodies matching the theme that you choose. These include party invitations, hats, table mats, return gifts and hoards of game prizes. 


2. Out of the four characters in the Ronald theme I used up Ronald's cutout in the frame above.

3. I then used the rest of them to make 3 photo props below.

4. Simply cut out the design and stick them on wooden skewers. I also added the 'Ronald and the gang' badge from the party invites.


C. Birthday Cake - In Ronald McDonald theme

I wanted a cake in red and yellow to go with the theme colors. We got one custom made from a home baker.


D. Third DIY - Cake Toppers

1. I made cake toppers from the party invitation cards that were provided to us. 

2. Simply fussy cut the image and stick them on wooden skewers like I did for the photo props.


These are the birthday invitations provided by Mc Donald's. I used a few of them for my DIY projects.


I must say I really liked the party packages that Mc Donald's offers. I have jotted down a few pros for the same...

1. You can choose from an array of available themes like Ronald McDonald, Spongebob, etc.
2. You get matching paraphilia for the party.
3. Standard decor and table set-up. 
4. Party backdrop
5. Mascot appearance as per theme
6. Party host and MC
7. Standard McDo meal packages and custom packages available too
8. You can order their standard cake or get your own
9. They usually have tie-ups with event planners in case you want to setup additional candy tables, etc.
10. They also liaison with some photographers who have various packages and custom photo booth options.
11. The return gifts are nicely packaged in their custom theme boxes.
12. They offer loads of themed goodies as prizes for all the games.


The table set-up....


Mascot appearance....


My son was in love with this mascot and danced so much with him.


If you have queries regarding the DIY's or related to the birthday party at Mc Donald's, please leave a comment below and I shall answer it as soon as possible. 

Thanks a lot for dropping by!!

December 12, 2016

DIY Paper Christmas Tree

Hi everyone!! Today I have another post for the holiday season. There are innumerable ways to make your own Christmas tree. Being a paper crafter, I had to make one with just paper.


Material required:
Green card stock
Empty aluminium foil roll or any stick for the stem
Scissors
Glue
Misc chipboard and simple stickers for decorating


You can decide to have as many layers for the Xmas tree as you like. It can also depend on the length of the stem/foil roll. I have made 5 layers for the Xmas tree shown here. 


1. Cut out 5 circles from the green card stock. I used plates to cut out the circles.


2. Fold each circle into half and open it. Then fold again into half so as to get a cross in the center.

3. Continue to open and align along the earlier lines to make more folds and get a total of 8 crease lines one each circle. This will give you 16 sections on the circle.

4. Fold the circle into quarter and cut out the top portion as shown. This will give space to thread the layers onto the stem easily.


5. Starting from one end of the circle, very carefully fold along the crease lines to get one valley and one mountain fold (fan fold).

6. This will form one layer of the tree as shown in the pic above.

7.  Once all the layers are ready, arrange them onto the stem and decide the placement. 

8. Remember not to cut open the topmost layer as it will sit on top of the stem. 

9. Glue the layers from the center onto the stem.

10. The tree is ready to be decked up. I initially stuck just a few plain star stickers on it. But later on added more chipboard elements to decorate the Xmas tree. I also made a star with glitter foam sheet to stick on the top of the Xmas tree.


Hope you try out this very fun and interesting project. Also do check out my post on DIY Snowman

Here's a peek of how we have decorated our living room for Xmas this year!!


Wishing a very Happy Holiday season to all my friends and blog followers!!

December 11, 2016

DIY Snowman

Hi friends.... today I have a fun post to share with you all. This is an awesome holiday project that you can easily make at home with your kids. I made this for my son and he totally adores his snowman. 


So let's get started with making the Snowman!!

Materials required:
2 styrofoam/thermocol balls of different sizes
Cotton
One wooden barbecue stick
Black paper for eyes, mouth, buttons and hat
Orange paper for nose
Twigs for arms
Red cloth for muffler
Glue
Scissors


1. Take 2 styrofoam or thermocol balls, one slightly smaller than the other.


[Image source: Google]


2. Join them together using a wooden barbecue skewer. I found this the best way to stick them together. You may try using glue gun too, but this acts as a spine for the snowman and provides good support.

3. Pierce the skewer half way through one ball first and then place the second ball on top of it.

4. Apply glue all over the surface of the balls and stick cotton on it. 

5. You will need to shred the cotton apart to make it light and fluffy. You can keep the balls as is,  but gluing cotton on the balls gives a nice snowy look.

6. Next, cut out 2 circles from black paper to make the eyes of the snowman. The diameter of the circle will depend on the size of your snowman.

7. Take an orange piece of paper and make a cone out of it to form the nose of the snowman.

8. Punch out 5 tiny circles to make the snowman's mouth. You can also cut out a new moon shape from black paper to make the mouth.

9. Cut 2 more circles, to make the buttons of the snowman and stick them on the lower part of his body.

10. Take 2 twigs or any other material that you may have on hand, to make the arms of the snowman.

11. Wrap a piece of red cloth around his neck to make the muffler.

12. Place a paper hat/woollen cap on his head. And this completes our DIY snowman.

You can make a base for the snowman to sit on, so that it doesn't wobble. I used an empty tape roll to place the snowman on top of it. And then stuck that tape on top of a piece of cardboard.


To make the paper hat:
1. Cut a circle proportionate to the head of the snowman. This is the base of the hat. 
2. Then roll a rectangular piece of paper to form a cylindrical shape. The diameter of this cylinder should be an inch or half smaller than the base circle. 
3. Stick this cylindrical shape on the base. 
4. Cut out another circle to close the opening of the cylindrical shape. The hat is complete....


Hope you like this post and enjoy making this with your kids. Also do check out my post on DIY Christmas Tree


September 4, 2016

DIY Floral Bouquet Magnets

Hi friends. Today I will be sharing two posts with you. These are related to the stuff I made for my son's pre-school teachers. Earlier I had made bookmarks for the teachers. You may refer to that post here

In this post I am sharing these cute little Floral Bouquet Magnets. Since I had little time on hand I took a bunch of ready made flower mix that I had in my stash. Quickly bunched them together to form mini bouquets, and wrapped them up with bright yellow paper. Secured the paper with a twist tie. I cut out square pieces from magnetic sheets and glued them behind the bouquets. 


I fell in love with these cuties..... To view the full post on what more I made for Teacher's Day and how I packaged them all together.... please visit my second post for today!!

Thank You!

August 11, 2016

DIY Lamp Shade Makeover

Hello! Today I am sharing how I upcycled this boring looking lampshade into an interesting one by just using pattern papers and tape. 


Below is a step-by-step guide on to how make your own lamp shade sleeve. I am calling this a sleeve because I did not remove the old cover. I just covered it up with a new sleeve that can easily be slid on and off and I can change the look when desired.

Step 1: Select pattern papers of your choice. I have chosen a DCWV paper stack from Itsy Bitsy.

Step 2: We need 4 panels for the lamp shade. One panel measures around 8x11". Cut two panels of 8x11". For the other two panels, keep a 1" margin (length wise) on both sides so that we can overlap the paper while sticking.

Step 3: Apply strong adhesive or double sided tape on the panels that have the extra 1" margin.

Step 4: Stick the 4 pieces together. Do not adhere the 4th panel to the 1st one yet.

Step 5: You may decorate it by adding some lace or punch out designs using border punches. I have used MS border punches to punch out some designs in contrasting brown color and glued them to the top and bottom end of the panels.

Step 6: Wrap the panels around the old lamp shade base and stick the fourth panel over the first one.


Thanks for stopping by my blog!!

October 6, 2015

Baby Name Monogram

Hello! This post is about a Monogram I made for a baby girl. The baby's name is Shrunal, and hence the S shaped monogram. I used a pretty pattern paper to cover the cardboard 'S' shape and then embellished it with flowers, chipboard elements, a handmade heart embellishment, some die-cuts, etc.


I used alphabet stickers for the baby name and stuck it in the form of a filmstrip.


Here is a quick look at the video of the monogram.


Thanks for coming over at my blog!

October 19, 2014

How to make a Dot Rangoli in 5 Steps

It's festive time here in India and I love to decorate my home with beautiful rangoli (floor art). I am not an expert nor have I learnt it formally. I just love to experiment with my rangolis each year and today I am going to share my process of making a portable rangoli with colors. 


I found this method easier as you can make this rangoli sitting inside your house, unlike the traditional method of sitting outside on the floor. I adopted this process mainly because here in Mumbai we have very less space outside the flats to make huge rangolis, and also sitting outside is not viable because of the humid weather and space constraints. I have this 12 x 12" square piece of wooden ply, which I use to make my rangoli every year. You may make any kind of design on it, but I usually find the dot rangoli easier to do.

Material required:
  • Wooden plank - preferably square
  • Dot rangoli patterns (lots available online)
  • White Rangoli powder
  • Rangoli Colors
Here are the steps with pictures....

Step 1:
Select the desired rangoli pattern that you want to make from a book or any other source. As per the design, mark dots at equal distance all over base (wooden ply). 


You can use  a scale or a paper stencil like the one shown here to do the markings.


Step 2:
Since I am not very good with it, I generally use a pencil/chalk to draw the design on the base to get it right. I have faced situations where I had to redo the entire stuff, if I try to make it with colors directly.


Step 3:
Use the plain white rangoli powder, to make the outline.


Step 4: 
Prepare the colors by mixing in the white powder.


Step 5:
Start filling in the patterns, one color at a time. I have first filled in green color in the image below.

Then fill second color, and so on...


Here is the ready rangoli!! You can now pick it up carefully and place at any corner of the house.


Light earthen lamps and place over the rangoli.


This is another example of the dot rangoli that I had made during Diwali, in the year 2012.


Have a safe & wonderful Diwali. If you get inspired by my tutorial, please do let me know and share your rangoli pictures with me. :)

October 17, 2014

Decoupage Mdf Jewellery Box

Hey there! Finally I tried my hand at another big decoupage project. I bought this six compartment mdf box from Craftslane. I wanted to make a jewellery box for myself so I wasn't afraid to experiment with this one. The pink according to me is a bit darker than I wanted it to be. But I guess it doesn't look that bad!! :)


I coated the box with white wood primer, and then painted with pink acrylic paint. Then I pasted the decoupage hydrangea tissue paper design all over the box. I then applied a generous coat of mod modge over it. To embellish it, I dug out these pretty flowers from Itsy Bitsy that I had been hoarding since a long time. The butterfly chipboard embellishment is also from Itsy Bitsy.
 
I created a cluster at the left top corner with a metal fairy charm and loads of pearls.
  
I also liberally stuck two lines of pearl and rhinestone border on all sides of the box.
 
And here it is, filled with all my junk jewellery :) It is also apt for gifting on festivals. You can fill it up with dry fruits or other gifts.
 
Challenges Entered

October 9, 2014

Decoupage Mug

Hi. This is another DIY decoupage project that I made for my craft desk.
 
 
 I had this porcelain mug from Radio Mirchi with me for many years and I was kind of bored with it now. I decided to give it a fresh look with decoupage. The base coat is peach acrylic color. Then I glued the decoupage design with mod podge over the mug. Once dry, I applied a coat of mod podge over the entire design.


September 20, 2014

DIY Coasters 2 - Decoupage

Hi. This is the second coasters' set that I made for my mom. Unlike the one I made for my home (left in image I), this one is bright and colourful. I chose DCWV pattern papers with fruits so that it matches mom's dining room decor. 


Related Posts Plugin for WordPress, Blogger...