Showing posts with label 3D Cards. Show all posts

May 23, 2017

Double Tri-Shutter Card - Love Theme

Hi friends, today I am sharing a special fold card with Love theme. It's a Double Tri-shutter card with chalkboard design.


Below is the step by step guide as to how I created this card. This card was part of my DT project at Mudra

1. Made a Double Tri-shutter card using black CS.
2. Decorated it using pattern papers.
3. Then made four 4x3" panels to use as embellishments for the card.
4. Stamped using VersaMark ink and embossed with white embossing powder.
5. Added few elements using Signo White gel pen.
5. Drew borders using the same gel pen around the black embossed pieces.
6. Also stamped few images with Hero Arts Unicorn White ink to make my own custom chalkboard elements/stickers to decorate the smaller panels of the card.
7. Made a shaker element for the front panel using the heart die-cut and Mudra's Sugar Plum and Clear Sequins Mix.
8. Finished off the card by adding all the embellishments, flowers, die-cuts, etc.
9. Added a seam binding ribbon to keep the card shut.


Here are all the detailed pictures of the card...


Here is a video with view of the complete Double Tri Shutter Card


Thanks for visiting my blog!

May 22, 2017

Romantic Music Theme Explosion Box

Hi everyone! Today I have a multi-layered Magic Explosion Box to share with you. The paper pack used here is from DCWV Autumn collection. I have used some metal embellishments and vintage ephemera to give it a vintage feel. 

This is how the box looks when closed.


Cute little metal charms, ephemera and embellishments adorn the lid of the box.


The box has three layers inside with lots of space for journaling and pictures. This is the outermost layer that has space for photos. 


This is the second layer which can also hold more pictures tucked behind the chipboard embellishments. 


The innermost layer has pockets to hold tags that can be used for journaling. It has more space outside for journaling.


In the centre of the explosion box is a miniature wooden piano. I made a mini music book to be placed on top of the piano. Also placed a small bouquet and metal clock charm on it.


September 4, 2015

Anniversary Explosion Box

Hello! This is an anniversary explosion box that I made recently on order. The client referred to one of my earlier explosion box that I had made and wanted a similar one for her special day. I have improvised a bit on the earlier one by adding additional heart flaps on the four corners and have also changed the layout of the chairs.


\


Here a quick video of the explosion box.


Thanks for visiting!!

June 18, 2014

Pop-up Box Card - Birthday

Hello. Here is another Pop-up Box Card made on Birthday theme. I have used loads of embellishments from Itsy Bitsy. The sentiments are from various stamp sets and the big circle birthday message is a digi.

 
Some space at the back for writing a personal message.
 
Close-up of the panels...


May 8, 2014

3D Card with handmade flowers

Hello!! Here's a 3D card that I completed recently, but I had designed the template for it long back and was looking for an apt design for it. The flowers, leaves and the branch that you see here are all handmade. I will try to share the template for this card, but I am not sure how to make the template in printable format.
 
The picture quality is not too good, so please excuse that.


Challenges entered
Lulupu Challenge # 30 - Feminine Cards
Stampin' Royalty #227 - May flowers
 Simon Says Stamp - Spring Flowers
 Crafting By Designs - Anything goes

February 14, 2014

Pop-up Box Card

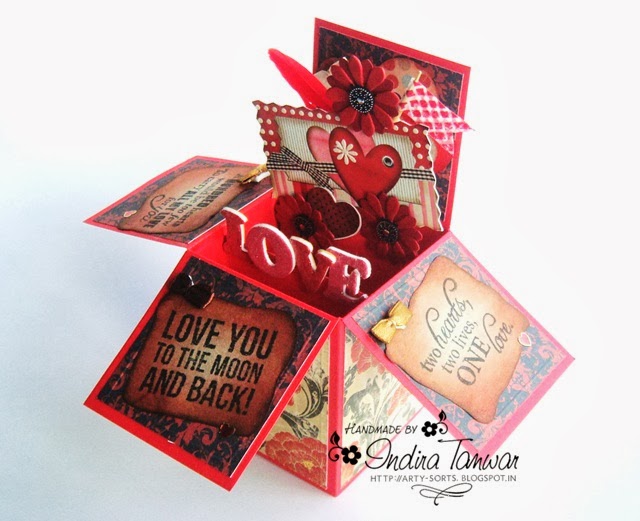
A few days back, I saw a tutorial for this type of card on Splitcoaststampers site and loved it to bits. It's like a short version of the explosion box, another favorite of mine. I wanted to try it out immediately. Here's a look at it.... and the beauty of this card is that it can be folded flat and tucked into a envelope or box!! How cool is that. I think I am gonna try more of these...


A close-up of the center part.... I have used a mix of stickers, flowers, feather and washi tape flag to adorn it.

I used brown paper from a cloth store paper carry bag and distressed it. I wanted an old vintage look on it. I have used the same paper to stamp the sentiments on. This space below, at the back of the box, can be used to scribble a private message.

This is how it can be folded flat....

The pattern paper used here is from Lulupu store: Bo Bunny Serenity Collection 6x6" Paper pad. 

Hope you like it and I would highly recommend to give it a try.

Challenges entered
Lulupu Challenge #25 - Oh So LOVE-ly!
Related Posts Plugin for WordPress, Blogger...