Showing posts with label Upcycling. Show all posts

August 11, 2016

DIY Lamp Shade Makeover

Hello! Today I am sharing how I upcycled this boring looking lampshade into an interesting one by just using pattern papers and tape. 


Below is a step-by-step guide on to how make your own lamp shade sleeve. I am calling this a sleeve because I did not remove the old cover. I just covered it up with a new sleeve that can easily be slid on and off and I can change the look when desired.

Step 1: Select pattern papers of your choice. I have chosen a DCWV paper stack from Itsy Bitsy.

Step 2: We need 4 panels for the lamp shade. One panel measures around 8x11". Cut two panels of 8x11". For the other two panels, keep a 1" margin (length wise) on both sides so that we can overlap the paper while sticking.

Step 3: Apply strong adhesive or double sided tape on the panels that have the extra 1" margin.

Step 4: Stick the 4 pieces together. Do not adhere the 4th panel to the 1st one yet.

Step 5: You may decorate it by adding some lace or punch out designs using border punches. I have used MS border punches to punch out some designs in contrasting brown color and glued them to the top and bottom end of the panels.

Step 6: Wrap the panels around the old lamp shade base and stick the fourth panel over the first one.


Thanks for stopping by my blog!!

February 3, 2014

Upcycled Photo Frame

Hi everyone!! Today I am sharing a photo frame that I upcycled. It was a small square handmade picture frame, with plain bronze paper on it. I thought to make good use of it by experimenting with some mixed media.

I glued scraps of PP on the frame with some mod podge. Coated the PP with some silver acrylic paint. Stamped randomly on the surface and attached some washi tape here and there. Then I used some waste material like red bull lid, broken bracelet, bolts, etc. The two hearts are made from perfume bottle boxes which had shiny cover on them.

Then I used a stencil to create a pattern with modeling paste on two corners of the frame. Once the paste dried up, I colored it using distress inks. Added a sentiment and black pearls to finish the project. Hope you all like my creation.


July 25, 2012

CD Mini Album

Hey! Sharing my first CD mini album. I wouldn't have dared to make this, if not for the swap arranged by the 3 stooges - Khushboo, Tejal and Soumya. And I must say their inpirations and helpful guidance helped me to make one and participate in the swap. I had absolute fun making this and I am now glued to making mini albums :)

**Picture heavy post**
The cover: I've used mixed sets of papers from Paper Mania for the entire album. The flowers are made using big daisy punch. The center of it is actually metal. I have used hair clips that come in different colors. I detached the twirls and placed them behind the flowers. The alphabet stickers are from Itsy Bitsy. The 1" craft binders are from A1 craft supply.
Panel 1: I have used bunting here using circle punch. For some more ideas on using circle punch, refer my tute here.
The frame die cut and tag are from Itsy Bitsy. The green butterflies are from Pie Lane. I also stamped the butterflies to create an added effect.


Panel 2: I really love this one coz it has a moving element. The four tags are lined together and fastened using an eyelet which allows movement. So when closed they all get in one line. When opened, they look like the pic below.
Panel 3:  These butterflies are from Itsy Bitsy again. I wanted to glam them up so I used my 5 petal flower punches for this. I have used 2 sizes of flowers, punched them on white glitter paper, cut each petal and stuck on to the b'fly. The center is done using black rhinestones. The flowers on the left are the ones made using small flower punch. 
Panel 4: Did you notice the bg here.... half moon shaped. Its a simple page to jot down Birthday memories. The cupcake and gift box embelishments are from Itsy Bitsy. 
Panel 5: I loved this page too..... the way it turned out to be. The letter I and white panel are handcut. Ribbons are from my stash. The pink flowers are punched using large flower punch. 
Panel 6: This is a simple one again. I added some flower shaped buttons. I cut a doily into half and used for bg on top of the PP. 
Panel 7: I have made a small pocket here with a tag insert.  
Panel 8: This is also an interesting page. I created some space for journalling. That cute li'l flag adds to the overall look of the page.  
Some more photos...... I just couldn't stop clicking :) :)

Tip: In case you don't have a punch to drill holes into the CDs, you can heat an iron nail and use it to drill holes in to the CD. I have used this technique for the CD Mini album. 

Challenges entered
Top Tip Tuesday: All about circles
There's Magic in the Air - Waste Not
Penny Black and More Summer Blooms
Anything Goes Challenge - #72 Let's Not Be Square

September 24, 2011

Recycled tin can

I remember my first tin can recycled project was when I was in second standard. My dad was posted in Shillong then. I used to cover tin cans of different shapes and sizes with colored paper and decorate them. I remember displaying them on a shelf in our store room and inviting my friends to see it ....a la exhibition :) Today I am posting one of my recycled tin can projects that I did last week, but didn't get the time to post it.

The original can....
Another very interesting recycled element of this project is the flower. The petals are made with dried seeds of pumpkin. The centre part is a cone.
Hope you all like my project. Please do let me know :)
Happy crafting!!

Challenges entered:
LESSology Challenge #2: The Trinket Box

September 11, 2011

Recycled Desktop Calendar

Hey there! Hope you all are having a nice weekend.
Today I am showcasing another recycled project of mine that I made yesterday.
I recycled an old desktop calendar into a double-sided photo frame, just in case you get bored of seeing one side all the time :) This is gonna adorn my hubby's office desk.

This is one of my pet projects and I have made it a couple of times earlier as well. (View ealier posts here and here for more ideas)
I loved making it all over again, and this time took pictures to show you how I made it.

Here is how to go about it:
1. Take an old desktop calendar and remove the leaves.
 2. Side 1 - Mark the area of the photo at the desired place on the calendar.
3. I used left over paper scraps to make the corners for holding the photo. It's a good idea to stick the corners on the surface before hand, so that you have an idea of how much space you have for decoration. Don't stick the photo on the frame so that you can keep changing the photo later on.
 4. Make the design on side 1. For the design on side 1, I used left over paper scraps to create the roses. The twigs are from my pot pouri. I added some beads on the twigs for an added effect.
I had seen jute twine in many creations of international bloggers. I made one for myself from the regular jute rope that we get. Like the anchor thread, the jute rope has numerous strands. Remove one strand and apply glue along the length of the strand. Roll it between your palms and voila, you have your jute twine ready.
The silver doodle is a sticker from Pie Lane.
 5. Side 2 - Mark the area of the photo on this side too. 
 6. The corners are made from left over paper scrap
7. Make the design for side 2 as desired. I made a quilled design for this side. 


 8. You may chose to remove the wire from the calendar and decorate it using ribbons, quilling strips or some other material. I used nylon stings of 2 colors to weave a criss-cross design as shown below.


Challenges entered:
Cheerfulstamppad: Recycle

January 29, 2010

Recycled Photo frame

I made a double-sided quilled photo frame using an old desptop calendar last week. It was very easy to make. Have a look!
This is one side......


The other side.........

I removed the wire which holds the two sides of the calendar together and inserted a long quilling strip into it. To cover up both ends I just added a pretty li'l bow.

June 8, 2009

Tie box.........


I made this Tie Box out of an old Shoe box for my husband. He has a huge collection of ties and I really didn't like them lying scattered in the cupboard. So I decided to make a box so that it becomes organized!! He loved the idea and I personalised it by writing his name on top!!! :-)))

October 4, 2007

Double-sided Photo frame

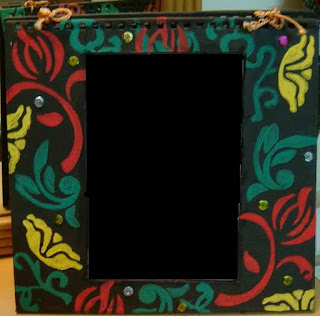
I created this photo frame from an old desktop calendar. This frame is double-sided, i.e. u can put pictures on both sides.

Remove the pages from the calendar and remove the spring on top. Then cut-out the mid portion of the size of ur photographs.
Decorate the frame as desired and embellish with sparkles and sequins.

For this frame I used sponge stamps from Hobby Ideas.

And voila, the frame is ready!!!


Related Posts Plugin for WordPress, Blogger...