Showing posts with label Distress Inks. Show all posts

October 30, 2014

Watercoloring with Distress Inks

Hello. In this card I have done watercoloring with Distress Inks on the flowers digi. The side strip is color-coordinated with same color distress ink as the flowers. For the card base, I punched the MS punch and added score lines onto the rest of the card.


I used the left over strip on the inside of the card and added a sentiment there too.

October 18, 2014

Handmade Diwali Cards 2014 - Design 2

Hello. So here is another Diwali card that I made this year. There's a lot of layering, stencilling and distressing done on the card base.


I decided to make my own diya (earthen lamp) embellishment. I used this stencil from Itsy Bitsy to trace an outline and cut a black silhouette of the diya with CS. Then I paper pieced other layer in different colors and popped them on one another with foam dots. Finished it off with some bling. The greeting is computer generated. The bg damask stencil is also from Itsy Bitsy.

October 6, 2014

Stripes Stencilled Background Card

Hello! Today's card is made using one of my stencils from The Crafter's Workshop. I have used Chipped Saphire distress ink to color  the bg wigth stencil. The flower was stamped using a wood mounted stamp. I first staped the full image in green and fussy cut it. Then a second image was stamped in red ink and only the flower was fussy cut. The red part was layered atop the green image using 3D foam tape.


Challenges entered
 Crafting When We Can Challenge #79 - No Designer Papers
Fashionable Stamping - #83 Anything Goes
 

June 13, 2014

Friendship Swap #6 - Art Journal

Hi everyone! Finally I get to share the altered art journal which I made for Friendship Swap #6, which is hosted by Riti Poddar. My partner for this swap was Monica Surayya. We get to know our partner names only after completing the project and sending final pictures to Riti. Till then it is a big surprise for us. Also, till the time I received my journal, I didn't know who was sending it to me :)
I have done this type of project for the first time. I totally enjoyed making this and was glad to know that my partner Monica loved it too.
 
 
To start with, we all used the same kind of art journal i.e. A5 Brustro Artists Sketch Pad. 
I first covered the book with DCWV pattern paper just the way we used to cover our school books. I then brushed it with some white acrylic paint to lighten some of the areas. You will again see my favorite stencil being used here for the cover and the tag inside. I used modeling paste with stencil at the top corner and colored it with distress ink to match the pattern paper. Luckily I had this matching lace in my stash which I used to hide the paper join since I have used two different papers for the front and back.
The spiral roses are handmade with white tissue paper and then colored using distress inks. The leaves are also handcut and colored using distress inks. I used the mdf cage as the focal point and placed all other elements around it. The tiny lock and key metal charms add to the overall look of the book. I loved how the small pearl cluster around the key came up.
 
 This is the back of the book. I kept it pretty simple with only the pattern paper. 
 
Finally, I added a small pocket with matching tag to hold some memorabilia.  

Here's a closer look at some of my favorite elements...
 
Challenges entered
Imaginations#1 - Anything Goes With Distress Inks [Used DI to color the roses and the modelling paste stencilled design]
Simon Says Stamp - Stencil 
Fresh Brewed Designs - Flowers and lace
Ruby's Rainbow #81 - Flora and fauna

May 15, 2014

Stencil Background Card 4

Hi, here is my 4th card in the series of cards with stenciled background. You may view all my cards made using stencils here.
 
For this card again I have used my favorite stencil from 'The Crafter's Workshop - 6 x 6 Doodling Template - Mini Echoes'. The background itself was so bright and pretty that I was finding it difficult to embellish the card. That is when I thought of using these flowers from a pattern paper pack. I fussy cut the flowers and adhered them with foam tape for dimension.

 
 Challenges entered
A Little Bit Crafty - Flower Power
Eclectic Paperie - Get Stenciled

May 6, 2014

Stencil Background Card 3

Hi all. This is the third card in my series of stencil background cards. You may view all my cards made using stencils here. The stencil used here is 'The Crafter's Workshop - 6 x 6 Doodling Template - Mini Echoes'. I have used the same set of distress inks as on this card, but the look is a lot different the card below. The difference is because of the paper used for stenciling. Here I have used watercolor paper and on the other card I had used non-porous glossy paper. I love the bold and vibrant look on this card.

Since the background is so bright, I wanted to keep the embellishments/other elements subtle. I chose silver glitter paper to make this lovely lily bunch.
 
Challenges entered

May 2, 2014

Stencil Background Card 2

This is the next card in the series of stencilled cards that I created recently. The stencil used here is 'The Crafter's Workshop - 6 x 6 Doodling Template - Mini Echoes'. I have done the stenciling with Ripe Permission, Worn Lipstick and Picked Raspbery distress inks on a glossy white paper. Using a glossy paper mellows down the color of distress inks, so if you need a softer look, it is ideal for that. The bloom and big leaves are handmade. The sentiment is stamped in vellum.


Challenges entered
Creative Colors Challenge # 9 - Color inspiration + Flowers

April 25, 2014

Stencil Background Card 1

Hey, my today's card is made using The Crafter's Workshop fish scales stencil. I recently got some new stencils and was playing with them. For this card, I have used glossy card stock and I must say the results are very different than that on water color or non-glossy paper. I love the neat finish on glossy paper and also the fact that the inks look softer on it. On watercolor paper, they give a bolder look.
The leaves are also made using stencils and Forest moss distress ink and then fussy cut. The flowers are all handmade. The sentiment is from Clearly Besotted sentiment stamp set.


Challenges entered
Aud Sentiments Challenge - #105 Use a sentiment or the number 4
Creative Knockouts - #34 Anything Goes 
Handmade Harbor -  Birthday/Best wishes
Crafting By Designs - Anything goes
Creative Moments - #39 Anything goes/Spring


March 4, 2014

Lattice Window Card - Blooming Flowers

Hey there... as you know these days I am going crazy experimenting with different lattice cards, so here I am with another one. Here, instead of weaving the lattice, I have used a die cut which I purchased from Nupur's store. The frame of course is handcut as I dnt own any die cutting machine.


The stamp set used here is from Ujjwal which she destashed recently. I have stamped, fussy cut and distressed these flowers and leaves. The flourish die-cut is also distressed using Forest Moss DI. That's all for today. Have a great day!

Challenges entered
Creative Moments - #37 Anything goes/Swirls and Pearls
Sweet Stamps - # 159 Spring Flowers
Just Inspirational Challenges: Theme + Photo Inspiration* - Flowers

February 20, 2014

Triangle Front Card

Hi Friends. Today I am sharing a very different kind of card that I saw on You Tube. I loved the simplicity of this card and I think with our imagination we can do a lot with it. In case you are not able to view the video, I have made a small template below to show you how to make this card. The template is not to scale and is only a guideline.


I have used this rose stencil from Pie Lane for the design on the center portion. Since I wanted multiple roses and not the full stem, I masked some areas of the stencil and made my own pattern.

The diagram below will give you an idea about how the triangle part is cut. Take any size of card say for example 4x6" in this case.  On the front side, mark the center point of the card and cut along dotted lines as shown. Cut another panel of the size of the card front which will be placed below the triangle part. For more details, do refer the video I have shared.


Challenges entered
Lulupu Challenge #26 - Try Something New !

February 7, 2014

Handcut Stencil Card

Hi lovely people out there! I am here to show you another card I created using a handcut
stencil. The fascination with stencils still continues after the Stencilled class....

I have been experimenting with stencils when I was in school and I used to trace the patterns that I liked and cut them using a normal craft knife or blade. I still have many of those stencils with me. After watching the Stenciled class, I was looking for more designs in my stash and didn't want to indulge in buying many of them and then not using them. Also I didn't have the patience to order and then wait to create till my stuff arrived.

So I decided to try cutting some patterns on my own. Here is a one with simple diagonal lines. I placed the stencil on CS and dabbed distress inks on it. Then I inverted the CS to make the criss cross pattern.

The paper I used to make the stencil is from an old diary. These were the separators inside the diary. These papers are of high gsm than the normal paper and have a glossy finish. I find it easy to cut through these papers.


Here is the stencil and the finished CS... I went in a VIBGYOR manner with the inks. I wanted to finsih the stenciled CS with ditressing the edges with co-ordination colors.

 This is the card I made using this as a background. Does anyone of you recognize this pattern I used on CS. Let me leave this open as a small quiz here. I will come back with the answer tomorrow :) HINT ***Clothing Brand***

That's all for now... cya and have a great weekend. If you have any queries regarding the stencils, do leave a comment below.

February 4, 2014

DIY Stencil

Hi guys.. this is another simple card that I made inspired by the Stenciled class.
I made a stencil using my giant daisy punch on a transparent packaging sheet. I must admit it is rather difficult to punch the packaging sheet. I could just partially punch and then the punch got stuck. I removed it carefully and cut out the uncut parts with a knife. I second stencil that I used is from Pie Lane.

I used Wild honey, worn lipstick and ripe permission distress inks for this technique. Used some beads from my stash to form the center of the flowers.

January 31, 2014

Stenciling using handcut stencil

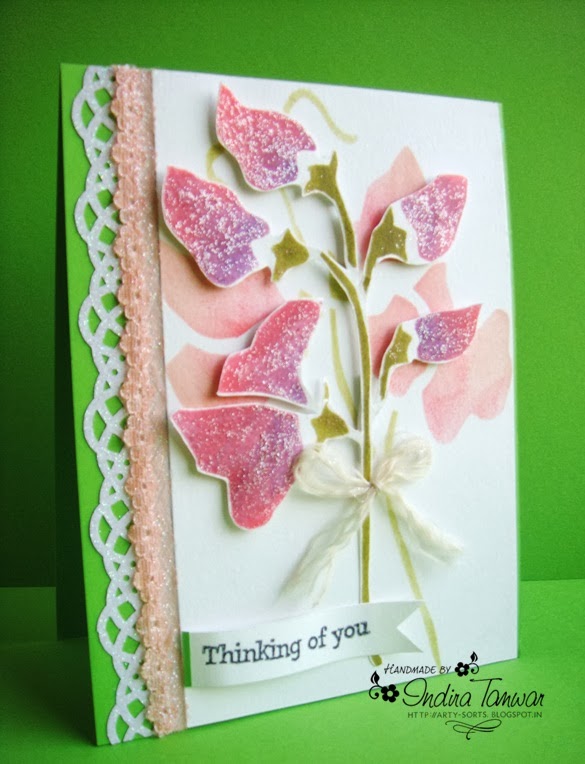
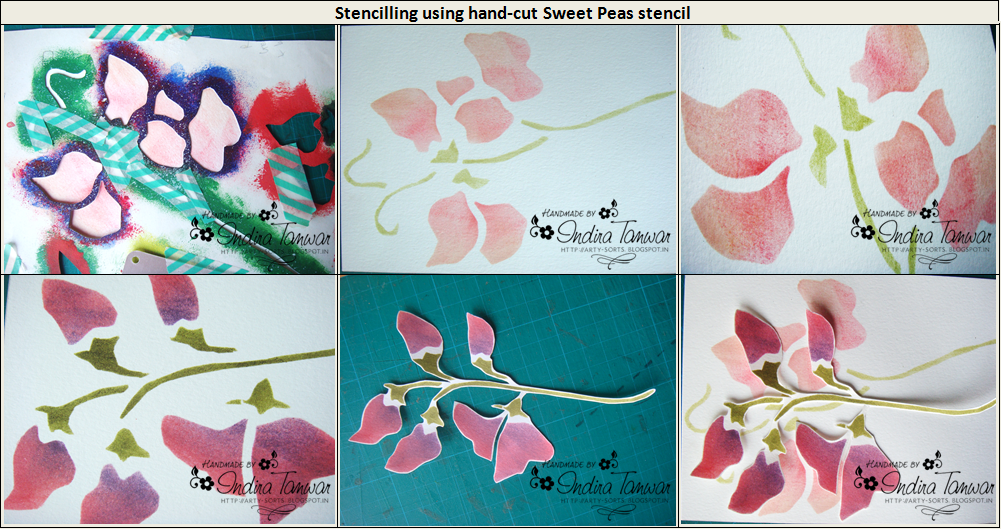
Hi all, today I am here to share a card I made using stencils. I had joined the online stenciled class and it made me dig out all the stencils I had with me. I experimented with an old stencil of mine which I had traced way back in 1998 on a normal sheet of paper. I have preserved it since then. I really love this sweet peas stencil. I visualised how I wanted my card to look like and started accordingly. I wanted a flower bunch in the background in light shades and a 3D bunch overlapping it.

I started with shading the stencil using distress inks. In the collage below you can see the behind the scene pics. I used foam tape to adhere the top bunch to create the 3D look. I finished the card by attaching the panel on a green CS. On the side I punched a silver glitter sheet border and glued it. I layered it witha peach lace to match the flowers. I added some stickles on the top layer to match the glitter border.


Here are some pics of work in progress. You can view my older cards made using stencils here.


January 23, 2014

Apron Shaped Card

Hi everyone!! I am back to my blog after a lonnnnnnnnnnnng break. First I went to Pune to meet my parents and then to Dubai for a much deserved annual vacation. Also work has been keeping me busy so I have not been able to craft regularly. I have been seeing lovely posts from my fellow crafters and admiring them. Hopefully I get on track soon :)

Here is a card that I made for my mom's birthday. I thought of making something simple yet meaningful. Since she is the best cook I know, I thought of making an apron shaped card for her.

This is my first try at an apron shaped card. I did have to experiment a bit :)
The card base is kraft colored card stock. I used the little border stamp from MME's 'Follow Your Heart Be Amazing Clear Acrylic Stamp' which I had pruchased from Crafters Corner, to outline the apron. The buttons were white in color and I did not have matching red buttons, so I colored them using my nail polish.


For the inside of the card, I printed this doll from the internet and colored it using distress inks.

A close-up of the coloring that I attempted :)

Thanks for stopping by. Wishing you all a Happy New Year. I know I am late, but nevertheless!

Challenges entered
Itsy Bitsy: Picture BINGO [Top row: PP, Ribbons, Inks]

November 2, 2013

Diwali Bloghop 2013!

Hi Everyone!   We are very excited to bring to you this Diwali Blog Hop 2013.  All you got to do to take part in this hop is to visit the blogs of all the lovely ladies of this hop. The blog list and hop order is given below.  


I have created this card for the blog hop. It's a CAS card made using stencils. I used a washi tape to make a frame for the stencilled image. The design is colored using Wild Honey Distress ink. 


Why should you take part in this blog hop?
Who wouldn't want to win some exciting goodies!! Yes, Chaitali is giving away 2 sets of her newest stamp set, Henna Swirls, to 2 lucky winners of the hop! She'll pick 2 winners from all comments on all the blogs!
 
The prize is sponsored by There She Goes!!

The hop order is:
  • Indira - http://arty-sorts.blogspot.com/  --> You are here!

  • Happy hopping, and wishing all of you a very Happy and Safe Diwali!!

    October 31, 2013

    Handmade Diwali Card using Stencils and Distress Inks - 2

    Hi, this is the second diwali card that I made using the damask stencil from Itsy Bitsy store.
    You can view my other card made using this stencil here...


    October 30, 2013

    Handmade Diwali Card using Stencils and Distress Inks

    Hello!! I am back with another diwali card using this beautiful damask stencil which I purchased from Itsy Bitsy store.


    This is the stencil that I used. Its so easy to use and the pattern is so pretty! 

    Challenges entered
    Craft Room Challenge - Stencils & Masks

    October 29, 2013

    Handmade Diwali Card with Distress Inks

    Hi everyone. I am sure everyone is soaking in the festive fervor and so am I... all the colorful things around inspire me create to some quick and bright diwali cards.

    I made this card using Wild honey DI. I have stamped the doily design using DI. The doily print is not perfect and it rather resembles a sunburst or halo effect. This is the kind of effect I was looking for. I have used stickers from Pie Lane on these circles and the smaller ones are from Hobby ideas. The sentiment sticker is a local buy.


    October 10, 2013

    Accordian Card

    Hi friends. I made this accordian card for my mom dad's anniversary. It is inspired by 2 cards: Isha's card at Lulupu and Monica Jot's Card .I absolutely love their style and work.
    The pictures were taken in a hurry and they do not reflect the real colors and beauty of the card. I have distressed the papers with broken china and peacock feathers ink and it looks very nice when you see it in real. For pink, I have used worn lipstick distress ink.

    There are many layers on the front side of the card. First is the PP, then die-cut, silver net and then the die-cut rose image.


    A close-up of the roses. This is from Lucy Cornwell's paper pack [Love it!!] I applied a bit of silver stickles on them for a shimmery look. The paper pack and diecuts are from Nupur's store.


    Here is an inside view of the card. The sentiment stamps are from Fiskars.


    Challenges entered
    Lulupu #18 - Load it up! [3 Layers: PP, Die-cut, net; Embellishments: Ribbon, pearls, diecut roses]
    Related Posts Plugin for WordPress, Blogger...