January 31, 2014

Stenciling using handcut stencil

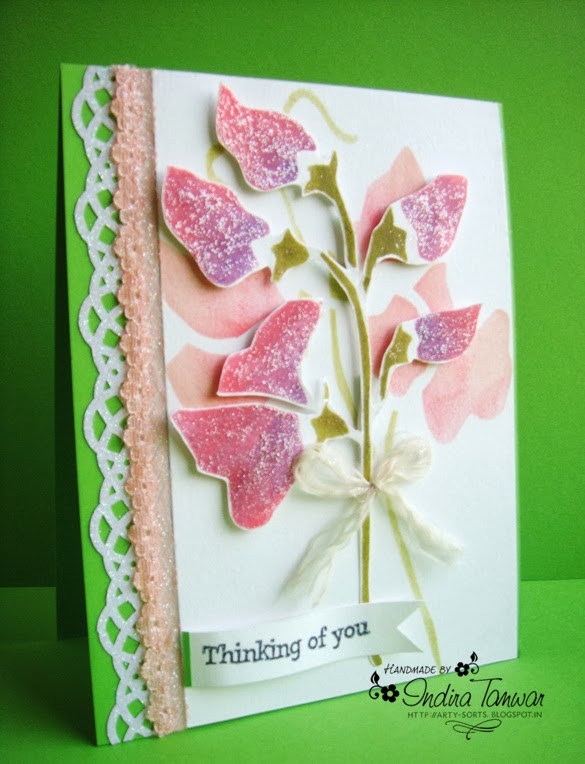
Hi all, today I am here to share a card I made using stencils. I had joined the online stenciled class and it made me dig out all the stencils I had with me. I experimented with an old stencil of mine which I had traced way back in 1998 on a normal sheet of paper. I have preserved it since then. I really love this sweet peas stencil. I visualised how I wanted my card to look like and started accordingly. I wanted a flower bunch in the background in light shades and a 3D bunch overlapping it.

I started with shading the stencil using distress inks. In the collage below you can see the behind the scene pics. I used foam tape to adhere the top bunch to create the 3D look. I finished the card by attaching the panel on a green CS. On the side I punched a silver glitter sheet border and glued it. I layered it witha peach lace to match the flowers. I added some stickles on the top layer to match the glitter border.


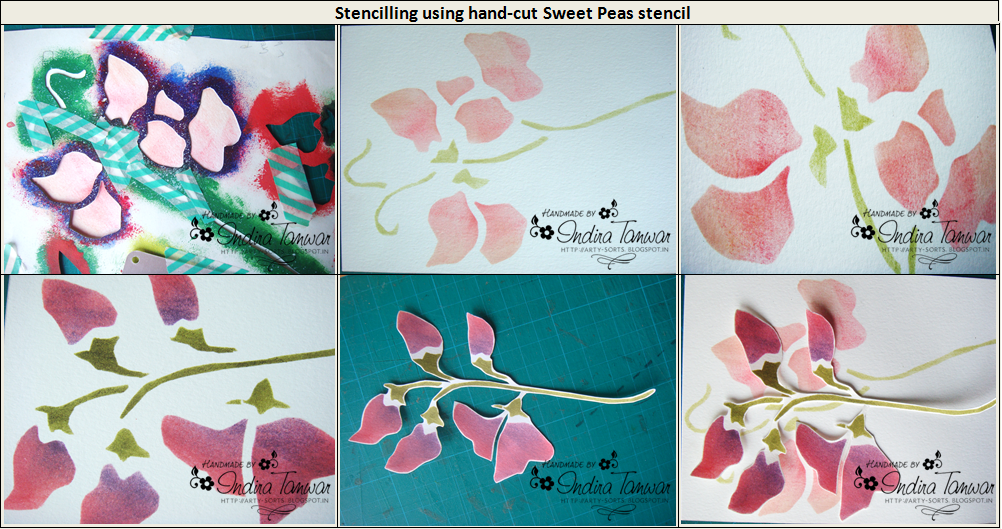


Here are some pics of work in progress. You can view my older cards made using stencils here.


January 23, 2014

Apron Shaped Card

Hi everyone!! I am back to my blog after a lonnnnnnnnnnnng break. First I went to Pune to meet my parents and then to Dubai for a much deserved annual vacation. Also work has been keeping me busy so I have not been able to craft regularly. I have been seeing lovely posts from my fellow crafters and admiring them. Hopefully I get on track soon :)

Here is a card that I made for my mom's birthday. I thought of making something simple yet meaningful. Since she is the best cook I know, I thought of making an apron shaped card for her.

This is my first try at an apron shaped card. I did have to experiment a bit :)
The card base is kraft colored card stock. I used the little border stamp from MME's 'Follow Your Heart Be Amazing Clear Acrylic Stamp' which I had pruchased from Crafters Corner, to outline the apron. The buttons were white in color and I did not have matching red buttons, so I colored them using my nail polish.


For the inside of the card, I printed this doll from the internet and colored it using distress inks.

A close-up of the coloring that I attempted :)

Thanks for stopping by. Wishing you all a Happy New Year. I know I am late, but nevertheless!

Challenges entered
Itsy Bitsy: Picture BINGO [Top row: PP, Ribbons, Inks]

December 21, 2013

Lulupu Blog Hop 3

Heya everyone!! I have been missing in action from the blog world for quite some time now. Just being lazy to carft. Hopefully in 2014 I am able to craft more  :)

Today I am here to post about Lulupu's Blog Hop no.3! Most of you must be knowing about this already. There are also some lovely challenges to participate and really bumper prizes to be won!!

So hurry and drop by Lulupu Blog to join in their celebrations!


November 2, 2013

Diwali Bloghop 2013!

Hi Everyone!   We are very excited to bring to you this Diwali Blog Hop 2013.  All you got to do to take part in this hop is to visit the blogs of all the lovely ladies of this hop. The blog list and hop order is given below.  


I have created this card for the blog hop. It's a CAS card made using stencils. I used a washi tape to make a frame for the stencilled image. The design is colored using Wild Honey Distress ink. 


Why should you take part in this blog hop?
Who wouldn't want to win some exciting goodies!! Yes, Chaitali is giving away 2 sets of her newest stamp set, Henna Swirls, to 2 lucky winners of the hop! She'll pick 2 winners from all comments on all the blogs!
 
The prize is sponsored by There She Goes!!

The hop order is:
  • Indira - http://arty-sorts.blogspot.com/  --> You are here!

  • Happy hopping, and wishing all of you a very Happy and Safe Diwali!!

    October 31, 2013

    Handmade Diwali Card using Stencils and Distress Inks - 2

    Hi, this is the second diwali card that I made using the damask stencil from Itsy Bitsy store.
    You can view my other card made using this stencil here...


    October 30, 2013

    Handmade Diwali Card using Stencils and Distress Inks

    Hello!! I am back with another diwali card using this beautiful damask stencil which I purchased from Itsy Bitsy store.


    This is the stencil that I used. Its so easy to use and the pattern is so pretty! 

    Challenges entered
    Craft Room Challenge - Stencils & Masks

    October 29, 2013

    Handmade Diwali Card with Distress Inks

    Hi everyone. I am sure everyone is soaking in the festive fervor and so am I... all the colorful things around inspire me create to some quick and bright diwali cards.

    I made this card using Wild honey DI. I have stamped the doily design using DI. The doily print is not perfect and it rather resembles a sunburst or halo effect. This is the kind of effect I was looking for. I have used stickers from Pie Lane on these circles and the smaller ones are from Hobby ideas. The sentiment sticker is a local buy.


    October 28, 2013

    Black and White Anniversary Card

    Hi folks. Here is a quick post to share a card I made particularly for Sindhu's challenge.
    Its a Black and White Anniversary Card. The sentiment is a digi. The couple silhouette is from internet. I traced it and handcut it. The black and white border is from Itsy Bitsy. I have added some lace below the border to add a touch of elegance.


    Challenges entered
    The Crafting Cafe - Anything Goes
    Perfectly Rustic - Pattern Paper

    October 21, 2013

    Quilled Name Plate - Angak

    This is another quilled name plate that I made on order recently. Since it is for a boy, the color palette is mainly blue. I didn't want to keep it simple and straight forward so I have overlapped the alphabets and arranged in this manner.

    The work is this name plate is very minute and it took me more time to create this as compared to other one I made for NAVIKA. 


     Few close-ups...

    If you wish to see more of my name plates click here.
    Thanks for dropping by and for your sweet comments! Have a great day!!

    Challenges entered
    Itsy Bitsy - Anything Goes
    DCAM Challenge #3 - Photo inspiration

    October 17, 2013

    Quilled Name Plate - NAVIKA

    Hi friends! I am very excited to share this Quilled Name Plate that I made on order. I had very little time in hand to finish this owing to work and festivities, but I am glad I could deliver it on time.

    Though I have made many Name plates for kids in past, this was my first quilled name plate for a kid. I had made one quilled name plate for a couple using bee hive technique. But I have tried this type of quilling technique for the first time. I would like to thank few bloggers whose work inspired me.

    So here goes the Quilled Name Plate for baby Navika.


     A close-up angular shot..
      Side view...


     Another side view...


    Few more close-ups


     Hope you like my work. Would to glad to hear your comments/suggestions!

    Challenges entered
    Itsy Bitsy - Anything Goes
    DCAM Challenge #3 - Photo inspiration
    A Creative Romance - Pink
    Alphabet Challenge - R for Roses
    Related Posts Plugin for WordPress, Blogger...