October 31, 2012

DIY Festive Decor

Hi. I know everyone must be excited and really busy preparing for Diwali. I made a whopping 10 cards in a day for Diwali. Will try and share them here soon.
In the meanwhile, I wanted to share a quick DIY project for Diwali.
I had shared this project earlier too [prev link], and this is a variation of that. It's so easy to make and adds an instant festive look to your room.
You can make napkin rings with tissue roll for your home matching your crockery, décor and occasion.

I made two napkin rings: one on Diwali theme and other on Christmas theme. I have a Christmas themed napkin set, so I made the napkin ring to match it.

 How-to make your own napkin rings in 3 steps:
1. Cut a tissue roll into 4 equal pieces using sharp knife/blade.
2. Cover the roll with designer/wrapping paper.
3. Decorate as desired with flowers, ribbon, laces, etc.

October 25, 2012

Best Wishes on your Wedding

Hi All. Hope you had a great time with family on Dushera. The festival season has started in India and I feel like going shopping, celebrating with family and taking a break from craft. Have not crafted since a long time now.
Just then my husband asked me to make a card for his colleague who recently got married.
This is what I came up with. It's an easel card. I wanted to have a lace and pearl effect in white as she is a Christian. I used my MS Lace punch for the upper part. The pretty pink matt textured paper is a RAK from Hussena.
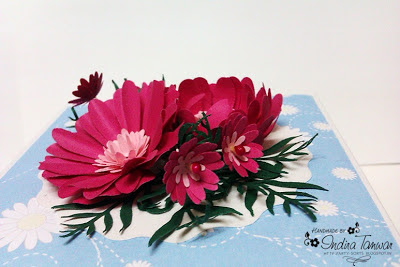
The flower is handmade and is really very easy to make. I made it in 3 different colors. Might share a tute as soon as time permits. The sentiment is from Itsy Bitsy. The matching pink lace is from Pune. And the white satin ribbon and pearls are from my stash.
 A closer look at the flower....
 Front look of the card...
Challenges entered
Penny's Paper-Crafty - #99 Ribbon and/or buttons
Stamp n Doodle - ribbon/twine
The Perfect Sentiment - must have sentiment on front
Anything Goes Challenge - #78 Make your Own Embellishments
Bearly Mine - #58 Easel Card
Creative Card Crew - #22 Fancy Folds

October 18, 2012

Kids Name Plate

Hi All.  Today I am sharing a project that mothers can make along with kids. It is ideal to hang on the child's room door. It can also be used to decorate kids room.

Below is a step by step tutorial on how I made this:
1. To start with, take a piece of card board. This needs to be covered with designer paper. You can take any light colored wrapping paper also. I have used the backing paper which comes with big stickers.
 2. Cut out alphabets of the kid's name in different colors of paper. You may either take pattern papers, plain paper in different colors or sticker alphabets.

 3. Ink the edges of the alphabets using colored ink pads or even a sketch pen would do. This makes the alphabets stand out a bit.
 4. Stick the alphabets on the paper and draw an outline with pencil. Cut along this outline to make the nameplate.
 5. Cut the paper and the card board along the outline and stick them together.
 6. Punch holes on the two top most points of the board and tie a ribbon or string to hang the name plate.
 7. This is how it looks after tying the ribbons.
 8. Decorate the board as desired using stickers, flowers, etc.
Challenges entered
Itsy Bitsy - Make it Dimensional
All That Scrap Wednesday Challenge - Anything but a card 
Flutterby Wednesdays - #210 any winged creature  
Inky Impressions - Anything but a card
Ruby's Rainbow - #39 Cute and Cuddly
Crafty Sentiments -Bows Or Ribbons
Kenny K`s Krafty Krew - Think Pink

October 17, 2012

Happy Birthday Dad

Hi friends. Here is a card I made for my dad. His birthday was on 11th October. It's a sheer co-incidence that I used only green colors PP for the card. My dad has retired from Indian Army and their uniform color is also Green :) [Olive Green].
 The embellishments are handmade and are a mashup of various things. I removed one layer form cardboard box and got this corrugated sheet. Then I cut it into heart and flower shapes. The center of the flower is a piece of metal from broken bracelet.
 I layered the heart with tile punch cutout. Then I drilled 2 holes into it like a button and threaded the string.

Challenges entered
Anything Goes Challenge - #78 Make your Own Embellishments
Celebrate the Occasion -  #84 Male Birthday
Delicious Doodles - Monochrome
Stamp with Fun - 3 papers

October 15, 2012

Exploding Box - Birthday theme

Hi All. Here is another Exploding Box that I made on order for a lady doctor. She loved the gift a lot. This is my second one on Birthday theme. You may see my other exploding boxes here on various themes.
 I made these blooms by layering big daisy flower punch.
 A peek into the box as the lid opens...
 The cute and bright butterflies...
 The full layout when the box is opened fully.
 I decorated the cake with daisy flowers, doily punch lace and pearls.
 Since the box was being gifted to her from her joint family, these tags were useful for everyone to write their personal messages for her.
 More tags...
 This is the 3rd panel
 This is the 4th panel
 Side view of the cake. Used lot of pearls to decorate it.
Do let me know your view on this :)

Challenges entered
Itsy Bitsy - Make it Dimensional
Crafter's Corner - Celebrate with Flowers
Lulupu:Challenge #5 - My Fav 4 [I used diagonal D1]
Fairy Tale - Something with a Photo
Just Add Ink – Just add bright colors

October 11, 2012

Quilled Bookmarks for Swap

This is a long due post. I had made 22 bookmarks for National Quilling Swap arranged by Gopi Shah. 22 people participated in the first ever quilling swap held in India and we had to make bookmarks equal to the number of participants.
This is the entire bunch. I have made all in same design but different colors and the type of papers used are also very different. Do have a look at the individual pics below. I have grouped them by colors.
I have used papers from magazines for these red ones
 For these I have recycled an old greeting card...
 For these I used wrapping paper on top..
 For these I have trimmed borders from journals and punched them
 For the blue ones I used paper scraps and punched them
 Here again I have used all assorted papers, some are from old cards, some from magazines and sone is from Itsy Bitsy sticker backing.
 Here also I have all assorted papers.

Challenges entered
C.R.A.F.T. - Monochromatic
Little Miss Muffet Challenges - One layer or CAS
Paper Play – Simply cute
Penny's Paper-Crafty - #97 Anything but a Card

October 10, 2012

Notecards Gift Boxes - Stamped Design

Hi All. Here is my 3rd set of Notecards Gift Boxes - Stamped version. I have made 2 of these designs with stamping. You may see my other sets here.
This is the first box with three set of notecards. Each card has a different sentiment.
This is the second box. The flower stamp is from Varna's store.
The 3 cards all by themselves.
Crafts and Me - #105 Anything Goes
Divas by Design - #56 Anything Goes
Penny's Paper-Crafty - #97 Anything but a Card

October 9, 2012

CAS Stamped Card

Hi friends. Posting after almost a week today. Not been feeling too well. The weather here is also very weird. It is sunny in the morning and rains every evening with lightning and thunder.
This is a CAS Stamped Card that I made. The colored paper is from Itsy Bitsy. I really like the colors and the texture of this paper. I punched the circles and randomly stamped the same stamp on the circles from different areas. The checkered ribbon is from stash. The star die cut is also from Itsy Bitsy.
Hope you all have a great day. Thanks for stopping by!

Challenges entered
Robyn`s Fetish - Circles
Sentimental Sundays - must include a Sentiment - Anything Goes
Catch The Bug - Anything Goes
Craftymess Challenge - #19 Anything Goes

October 3, 2012

Notecards Gift Boxes - Punched Flowers

Hi. This is another set of Notecards Gift Boxes that I made using negatives of Punched Flowers. The first set using tile punch was posted here.
 This is the large daisy punch. I have made 3 notecards in 3 different colors.
This is another 5 petal punch.
 This is the full set.
  Full set of 3 notecards
 Challenges entered
Itsy Bitsy - 'Make it Dimensional' Challenge
PPS - Make a Set of Three Cards

October 1, 2012

Guest Designing for BGC

Hello everyone! Today I am sharing a card that I made for Beyong Grey Challenges #18 - Photo Inspiration, as Guest Designer.
This is the inspiration pic. Do hop on to BGC to join the challenge and see other details.
Here is my take on the picture...I have primarily picked up the color pink with a hint og Melon and turquoise.
 Front view...
 A close-up of the mulberry flowers. Aren't they cute!
 The Beauty Queen sentiment is a digi.
 Challenges Entered
Crafter's Corner:#1 - Celebrate with Flowers
Trapped in Craft - Challenge #2: Photo inspiration
The Cutie Pie Challenge - cards - Use a Digi
Related Posts Plugin for WordPress, Blogger...