September 29, 2011

Quilled cherries

Hey there! How are you all doing?
Finally, got the time to post this card I made last Sunday. 
 A close-up of the cherries. I put glitter on the cherries and the leaves from Hobby Ideas for an added effect. The red rhinestones are from Pie Lane.
 The card is inspired by ICRC10 Challenge theme to use a Sketch + Fabric/Felt. 
Below is the challenge pad.

The border is made by folding square pieces of fabric in the form illustrated below.
 Take square pieces of fabric and fold it into half. Again fold this into half.
 Overlap the two ends and sew them.
Challenges entered:
ICRC10 - Sketch + Use Fabric/Felt
4 Crafty Chicks: Challenge #57 Anything goes
Digistamps 4 Joy: #28 Anything goes
Penny's Paper-Crafty: #63 Anything goes

September 24, 2011

Recycled tin can

I remember my first tin can recycled project was when I was in second standard. My dad was posted in Shillong then. I used to cover tin cans of different shapes and sizes with colored paper and decorate them. I remember displaying them on a shelf in our store room and inviting my friends to see it ....a la exhibition :) Today I am posting one of my recycled tin can projects that I did last week, but didn't get the time to post it.

The original can....
Another very interesting recycled element of this project is the flower. The petals are made with dried seeds of pumpkin. The centre part is a cone.
Hope you all like my project. Please do let me know :)
Happy crafting!!

Challenges entered:
LESSology Challenge #2: The Trinket Box

September 19, 2011

Napkin rings

Can you guess without scrolling down what these napkin rings are made up of?
I had these beads (kaudi in punjabi) lying around from an old wall hanging. I made flowers with it. The wooden bead in the center is from a broken bracelet.
 I cut one tissue paper roll into 4 pieces. Wrapped them up with brown paper and decorated it! Simple isn't it!!

Pixie Dust Studio: Recycling is good
All Sorts Challenge: Allter/Recycle

September 18, 2011

Wreaths

I loved making wreaths since childhood and after a long time I got down to making not 1 but 2 of them at the same time.
I have used the plastic seal of the 20 litre Bisleri water bottle to make the wreaths on.
One of the wreaths is on Christmas theme while the other on Fall.
Have a sneak peek and do let me know which one you like more :)
 Back view
 Behind the scenes....
I wrapped the ring with brown tape for the fall wreath and green one for the other.
 Some tid bits from my discarded pot pouri.
 Assembled them together...
 And here we go...
 The other wreath is on Christmas theme. I made quilled poinsettias and holy leaves for this. The bells are also quilled.

 Happy crafting!

Challenges entered:
Cheerfulstamppad: Let's Reuse
Craft Room Challenge: Home Decor
Pixie Dust Studio: Recycling is good
HLSC Challenge #39: Fall leaves

I am also linking it up to a new challenge at Mindfull Meanderings: Artsy-Craftsy-Dec-2011.

September 15, 2011

Quilled Souvenir

My dear friend's hubby is going abroad to pursue higher education. They had been to our place yesterday. I really wanted to gift him a handmade souvenir that was small and cute, easy to carry and can be displayed anywhere with ease.

So this is what I came up with yesterday. I made it in about less than 2 hours, with few small breaks :)

Behind the scenes...
Used this old piece of cardboard on which these sticky note sort of non-sticky papers are stuck on. I wanted to use it since a long time for my project.
 Hope you like this quicky project of mine.
Do leave in ur views. I read each one of them and appreciate them whole-heartedly.

Challenges entered:
Cheerfulstamppad: Recycle
Wags n Whiskers Rubber Stamps: Anything but a Card
Freshbreweddesigns - Something New
Craft Room Challenge: Home Decor

September 11, 2011

Recycled Desktop Calendar

Hey there! Hope you all are having a nice weekend.
Today I am showcasing another recycled project of mine that I made yesterday.
I recycled an old desktop calendar into a double-sided photo frame, just in case you get bored of seeing one side all the time :) This is gonna adorn my hubby's office desk.

This is one of my pet projects and I have made it a couple of times earlier as well. (View ealier posts here and here for more ideas)
I loved making it all over again, and this time took pictures to show you how I made it.

Here is how to go about it:
1. Take an old desktop calendar and remove the leaves.
 2. Side 1 - Mark the area of the photo at the desired place on the calendar.
3. I used left over paper scraps to make the corners for holding the photo. It's a good idea to stick the corners on the surface before hand, so that you have an idea of how much space you have for decoration. Don't stick the photo on the frame so that you can keep changing the photo later on.
 4. Make the design on side 1. For the design on side 1, I used left over paper scraps to create the roses. The twigs are from my pot pouri. I added some beads on the twigs for an added effect.
I had seen jute twine in many creations of international bloggers. I made one for myself from the regular jute rope that we get. Like the anchor thread, the jute rope has numerous strands. Remove one strand and apply glue along the length of the strand. Roll it between your palms and voila, you have your jute twine ready.
The silver doodle is a sticker from Pie Lane.
 5. Side 2 - Mark the area of the photo on this side too. 
 6. The corners are made from left over paper scrap
7. Make the design for side 2 as desired. I made a quilled design for this side. 


 8. You may chose to remove the wire from the calendar and decorate it using ribbons, quilling strips or some other material. I used nylon stings of 2 colors to weave a criss-cross design as shown below.


Challenges entered:
Cheerfulstamppad: Recycle

September 8, 2011

Floral card

Hey frenz. A quick post for today. Some doodling and punched flowers make a simple and cheerful card :) Butterflies are from Pie Lane.

Challenges entered:
RCC 19: Anything goes  
Bearly Mine Challenge 9: Flowers Flowers Flowers
Creative Cards Crew: Anything goes

September 3, 2011

Mojo Monday 206

Hi. Today's card is based on Mojo Monday Sketch Challenge 206. I have demonstrated below how I made this card. Most of the supplies used in this card are recycled.


 The background PP is cut out from a magazine. I used Levis price tag for the embelishment. The flower pot image is a stamp from Hobby Ideas.The ink used is also from Hobby Ideas.
The ribbon is actually the extra lining that we get with the readymade gents trouser. (They give it in a small packet with an extra button). The ribbon was placed such that it covered the text on the PP. Also the flower pot was strategically glued on the tag to hide text 'Levis'. The 2 sequins used on both sides of the ribbon are from an old top.
I cut the Levis tag into two parts. I punched out the flowers from the 2nd part of the tag. 
 Here's how you can make the flower. Punch out the flower in 3 different sizes.
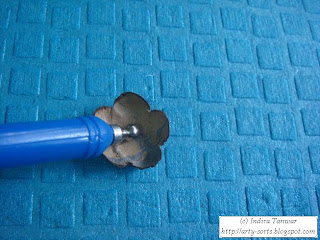
 Ink the edges of the flowers to give a shaded look. I have used brown ink from Hobby Ideas. Emboss the biggest petal from the reverse side.
 It should look like this when turned upside down.
 Now emboss it from the center from this side.
 Emboss the 2nd petal in the same manner.
 Emboss the smalled petal from one side only; the side which will be upwards.
 Use a single punch to make the center of the flower in brown color. Emboss it too.
 Layer the petals as shown and glue. You can vary the flower by adding just 2 petals, instead of 3.

Challenges entered:
Bearly Mine Challenge 9: Flowers Flowers Flowers
PaperPlay Challenges: Week 35 Make your own flowers
Cheerfulstamppad: Recycle
Creative Cards Crew: Anything goes
 Hope you find this tutorial useful!! Happy crafting!
Related Posts Plugin for WordPress, Blogger...