March 24, 2014

How to make a Lattice Window Card - Video Tutorial

Hi everyone! I recently posted quite a few lattice window cards and these were my first experiments with them. I also won some blog challenges for these cards of mine. One such win was at the Lulupu blog and I was invited to be the GD on their blog. So I made a video tutorial on how to make lattice window cards. There are many tutorials available on the net and each one has their own style. I have tried to showcase my style and how make these type of cards. Click here to view my GD post at Lulupu blog.

This is my first ever attempt on making a video tutorial, so kindly bear any kind of misses. Also please pardon the bad lighting and my badly abused craft mat. My husband pointed that out later :)


I did not get time to take pics side by side so I don't have a pictorial. Here are the pics of the completed card.


Thanks for dropping by. Do share your frank comments on how the video turned out to be.

UPDATED - 26 May 2014:
I made another version of this card. Here are the pics.

March 12, 2014

Triangle Front Card - Glitter Overload

Hi. Today I am sharing another triangle front card.....finally a little break from lattice cards :) For this card, I used a stencil from Pie Lane for the center motif. I laid the stencil on the card front and applied a thick coat of glue over it. Then I sprinkled the glitter generously over it. After removing the excess glitter, I got a light coat of glitter in the required area. I was not happy with the result, so I added another coat of glue and glitter over it.

At first, the central design was all that I intended to do on this card,  but then I wanted to play a bit more with the glitter, so I went ahead and added more lines at the blue base. For this look, I stuck double sided tape on the card base and sprinkled glitter all over it. For the extra bling, I added some flat silver gems to the card.


Challenges entered
Color Conceptions Challenge #8 - Glam With Glitter

March 7, 2014

Black Lattice Window Card

Hey guys! This is another card in the series of lattice cards that I have been making in the last couple of days. This time I wanted a red and black combo. The red poppy flower goes pretty well with the black backdrop. I got this digi from the net and colored it using Faber Castell color pencils. It was a bit tacky to fussy cut this, as it have many closed spaces which had to be cut-out with a craft knife. Instead of adhering it with 3D tape, this time I glued it directly on the lattice frame. The sentiment is heat embossed and the stamp set is from TPC.


Challenges entered
Lulupu Challenge #27 - Lulupu 2nd Birthday Special [L: Lattice, Leaves, P: Pencil Water colors, C: Card Stock, Cutting by hand]
 Elphine House - #55 Make your own background
Penny's Paper-Crafty - #167 Anything but Square
Paper Shelter Challenge - #148 Anything Goes

March 4, 2014

Lattice Window Card - Blooming Flowers

Hey there... as you know these days I am going crazy experimenting with different lattice cards, so here I am with another one. Here, instead of weaving the lattice, I have used a die cut which I purchased from Nupur's store. The frame of course is handcut as I dnt own any die cutting machine.


The stamp set used here is from Ujjwal which she destashed recently. I have stamped, fussy cut and distressed these flowers and leaves. The flourish die-cut is also distressed using Forest Moss DI. That's all for today. Have a great day!

Challenges entered
Creative Moments - #37 Anything goes/Swirls and Pearls
Sweet Stamps - # 159 Spring Flowers
Just Inspirational Challenges: Theme + Photo Inspiration* - Flowers

March 3, 2014

Framed Flowers

Hi All. Happy Monday! Hope you all had a great weekend. Today I am sharing a card wherein I tried making a frame with some paper cutting and punching. I used a pre-embossed sheet to make the frame. Then I weaved the ribbon onto the frame by punching holes at various positions. Punched the edges with an MS punch.


The image is from Beccy's place. I printed and then colored it using Faber Castell watercolor pencils. Added some pearls on 4 corners to finish my card.

Challenges entered
Create Something Catchy Challenges #1 - Picture inspiration 
Lulupu Challenge #27 - Lulupu 2nd Birthday Special [L - Leaves, P - Punches, Pearls, Pencil colors, C - Coloring digis, Card Stock]

February 26, 2014

Lattice Window Card

Hi everyone!! I have been meaning to try out a lattice window card since a very long time, and finally I got the time for it. Though tedious, I loved creating this lattice window. I am also going to try out different versions of it. I first created this panel and then mounted it on a green card base. Love how the green peeps out of the white panel.


I also have been doing a lot of watercoloring these days... my cards in coming days will reveal those! I printed a whole lot of these pretty digis from the net and colored them using Faber Castell watercolor pencils. This one is from Beccy's blog. When I completed coloring this, I had a vision in mind as to how I wanted my card to be and I was able to achieve what I had thought of. I wanted a very subtle but intricate background for this.

Here's a look at behind the scene pics... I used an old piece of CS to create the lattice, thus the coloring on the strips. 

That's all for today... Ciao!!

Challenges entered
BGC #46 - Love is in the Air
Lulupu Challenge #26 - Try Something New !

February 20, 2014

Triangle Front Card

Hi Friends. Today I am sharing a very different kind of card that I saw on You Tube. I loved the simplicity of this card and I think with our imagination we can do a lot with it. In case you are not able to view the video, I have made a small template below to show you how to make this card. The template is not to scale and is only a guideline.


I have used this rose stencil from Pie Lane for the design on the center portion. Since I wanted multiple roses and not the full stem, I masked some areas of the stencil and made my own pattern.

The diagram below will give you an idea about how the triangle part is cut. Take any size of card say for example 4x6" in this case.  On the front side, mark the center point of the card and cut along dotted lines as shown. Cut another panel of the size of the card front which will be placed below the triangle part. For more details, do refer the video I have shared.


Challenges entered
Lulupu Challenge #26 - Try Something New !

February 17, 2014

Using Multiple Stamps on one card

Hey there. Here is a card that I created using stamps from multiple stamp sets simply because one stamp set did not have the kind of images I was looking for. I found this technique quite fun and I now feel I can get more from my stamps by combining them this way. The overall card is inspired by Jennifer Mcguire's this card.

I first stamped in the sentiment 'Hello' and then positioned the flowers and leaves around it. After stamping all the images with black ink, I started coloring with my Faber Castell color pencils. The alphabet stamp that I used here only has the outlines, so I filled the alphabets using silver pen. Then I finished the card with some gemstones in flower centers. For the border I have used a washi tape in the background.


Challenges entered
Lulupu Challenge #26 - Try Something New !
Crafty Sentiment Designs - Anything Goes
Ribbon Carousel Challenge - RCC90 Washi Tape
Sweet Stamps - # 157 Anything Goes

February 14, 2014

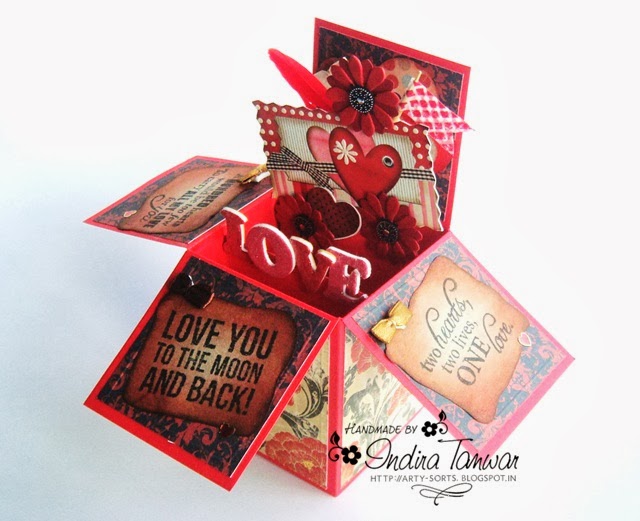
Pop-up Box Card

A few days back, I saw a tutorial for this type of card on Splitcoaststampers site and loved it to bits. It's like a short version of the explosion box, another favorite of mine. I wanted to try it out immediately. Here's a look at it.... and the beauty of this card is that it can be folded flat and tucked into a envelope or box!! How cool is that. I think I am gonna try more of these...


A close-up of the center part.... I have used a mix of stickers, flowers, feather and washi tape flag to adorn it.

I used brown paper from a cloth store paper carry bag and distressed it. I wanted an old vintage look on it. I have used the same paper to stamp the sentiments on. This space below, at the back of the box, can be used to scribble a private message.

This is how it can be folded flat....

The pattern paper used here is from Lulupu store: Bo Bunny Serenity Collection 6x6" Paper pad. 

Hope you like it and I would highly recommend to give it a try.

Challenges entered
Lulupu Challenge #25 - Oh So LOVE-ly!

February 13, 2014

Heart-shaped Triple Easel Card

Hey there.... today I am sharing a very special card that I made for my husband. It's a heart-shaped triple easel card. I used red CS for this and the paper pack is from DCWV.

The flowers are handmade. I had earlier posted a tutorial on my blog for these flowers.


This is how it looks when laid flat.

Challenges entered
Lulupu Challenge #25 - Oh So LOVE-ly!
Color Conceptions Challenge #7- Photo Inspiration [Inspiration was the color and geometric pattern]
Related Posts Plugin for WordPress, Blogger...